Can't install windows 8.1. Enable the update service
- Hello admin, I have a laptop with installed Windows 8, I'm thinking of upgrading to final Windows 8.1 . You probably updated yourself a long time ago? Tell me what are your impressions of new Windows 8.1? First of all I am interested in installed programs. After the update, do they all work or do some refuse to start? At one time I updated my Windows 8 to trial Windows 8.1 Preview and observed small glitches in operation that I did not like. In the final Windows 8.1, everything must be fixed. If I upgrade to Windows 8.1 and don’t like something, is there any way I can return to Windows 8? Yes, and I also know that I need to update through the Windows Store, but when I go there, for some reason there is no offer to update my Windows 8 to Windows 8.1.
- Tell me, how can I update Windows 7 to the final Windows 8.1 for free? Installed Windows 7 I have a license and even have a key for it?
- Hello, what if I don’t have a disk with Windows 8 and I don’t have a key either. But I want to install the final Windows 8.1 and work in it in trial (test) mode. How to do it?
- Question - I have a licensed disk with Windows 8, there is a key on the back of the box. Should I first install Windows 8 and enter the key, and then upgrade to Windows 8.1, or should I immediately install Windows 8.1 and enter the Windows 8 key in it? But where can I get the Windows 8.1 installation disk then?
- I can’t update to Windows 8.1, what should I do?
How to upgrade Windows 8 to the final Windows 8.1
Hello friends, I answer all letters first briefly, and then in detail and with screenshots.1) I also have it installed on one of my computers Windows 8 and we will very easily update it to the final Windows 8.1. But I want to say this - before upgrading to Windows 8.1, be sure that if you don’t like something in the new system, you won’t get Windows 8 back by simply restoring it.
2) If you want to upgrade Windows 7 to Windows 8.1, you won’t be able to do it for free, you need to follow this link to the official Microsoft website
Next, right-click on Windows 8.1 and launch the update assistant; during the update process you will purchase Windows 8.1. If you have already purchased a Windows 8.1 disk with a license key, then simply enter this key when updating.
3) If you don’t have a disk with Windows 8 and don’t have a license key either, but you want to install the final Windows 8.1 and work in it in trial (test) mode, then read our article. This article explains how to download completely legally from the Microsoft website. Windows image 8.1 Corporate, you can burn this image onto a DVD or disc, and then install the operating system on your computer.4) If you want to install Windows 8.1 on new computer, but you only have a Windows 8 installation disk with a license key on the box, then this key will not be suitable for installing Windows 8.1, even if you have a Windows 8.1 installation disk. You first need to install Windows 8, then update it through the Windows Store to the final Windows 8.1. Now about everything in detail.
Upgrading Windows 8 to the final Windows 8.1
If you have desktop computer or your laptop has Windows 8 installed and you want to update it to the final Windows 8.1, then left-click on the Start menu and go to the Windows 8 store.

If you don't have an offer to update Windows,

This means that updates are disabled in your operating system. Go to the update center and enable updates or click Install updates.

After installing the updates, the long-awaited “Free upgrade to Windows 8.1” window will appear.

Click on it and in the next window click Download.

The installation of the update starts, which occurs in the background.

At this time, you can continue your work in the operating system.
Once the update is complete, you will be warned that your computer will automatically reboot in 15 minutes. Shut down and reboot.


At this stage of the update, you will have to accept the license agreement and agree to use a valid account.
Well, the final Windows 8.1 is finally loading!

If you want to know the difference between Windows 8 and the final Windows 8.1, read our short one.
If you have more questions, you can read the Microsoft Help Upgrading to Windows 8.1 FAQ
http://windows.microsoft.com/ru-ru/windows-8/upgrade-to-windows-8
If they want to install any of the modern versions of operating systems, be it Windows 10 or Windows 7, users encounter problems that drive them into a stupor. Here is an example of such a problem.
You insert a disk into the drive, or an installation flash drive into a USB connector, boot from them and see the loading of a particular system. Next, the installer window appears, where we must select the disk to install Windows. There are some parameters there that we could use, but they are of no use to us now. As soon as we click the “Next” button to start installing Windows, the worst happens - an error "Setup was unable to create a new or find an existing system partition» .
There is an incredibly simple way to fix it on the Internet. It is as follows: you receive an error and immediately remove the flash drive or disk, and then close the installer by clicking on the cross. Next, we perform the installation again, try to install the Windows we need, get the same error, close it. Now we need to reinsert the installation flash drive or disk and start installing Windows.Unfortunately, this method, described just above, no longer helps, but there is another.
In order not to deal with such nonsense as plugging a flash drive, restarting something, etc., there are more effective method. Its essence is that you need to transfer the files from the flash drive on which Windows is located to the disk or partition where you were going to install it. In other words, we are making a future system partition installation disk, on which we will install Windows. Now let's move on to practice.
How to resolve the error “Setup was unable to create a new or find an existing system partition”?
Quick and easy, you just need to carefully read the instructions in this article.
- Insert it into your computer and boot from it;
- When a window appears asking you to select a disk, press the keys Shift+F10, to open the command line;
- IN command line write the command: diskpart;
- The command line now uses the DISKPART disk utility, then we write the command: list disk. This command shows all drives connected to the computer. We look for the required disk in the list (you can navigate by volume) and remember the number;
- select disk=0. With this command we select the disk. The number 0 is the number of the dick from the previous command; yours may be different.
When choosing a disk, be very careful, I recommend turning off other hard drives so that there are no problems later.
- Next we execute the command create partition primary size=XXXXX. In the place “XXXXX” you must enter the size of the system disk on which you will install Windows. In other words, a new partition will be created;
- select partition=1. Displays the partition of the disk we have selected;
- active. The selected section becomes active;
- format fs=ntfs quick. This command will quickly format the drive to file system NTFS;
- assign. This command will assign a letter to the section; if it is not specified independently, then the free next letter will be selected;
- exit. Exit the DISKPART utility.
So, we have completed all the necessary commands to create a partition for installing Windows, but now we need to transfer files from the flash drive to this partition.
- Open the command line again. You need to find out what letter your Windows flash drive is designated by. Using the cd command. That is, on the command line you would enter, for example, "cd e:", where e: is the letter of the installation flash drive. ;
- You are in the flash drive directory. We write a command to copy files to the system disk: xcopy e: c: /e /h /k;
- You need to go to the boot directory on the partition itself, not the flash drive: cd boot;
- Using the bootsect command we will create boot code on the system disk: bootsect /nt60 c:. Where c: is the system drive, be careful, you may have a different letter;
- We made a system partition boot disk. Now you can remove the USB flash drive, restart the computer and install Windows on the same disk. After installation, you can delete the installation files.
After installing Windows and loading it, you need to adjust a few things.
- Open the command line as administrator;
- We write the command bcdedit;
- Among the command results, find the line Windows Setup, where we copy identifier;
- Next we write the command bcdedit /delete (identifier).
Now you can use Windows without any problems.
Additional option
Alternatively, to resolve this error, you can use Boot Menu if this feature is supported. When you insert a flash drive, it may be in first place in the order of disks, or you did it yourself, because of this, Windows wants to write the MBR table not to the disk we need, but to the flash drive, but nothing comes of it, since it is in use you. Perhaps this is the reason for the above error.
To solve this, you can put the disk that will be the system disk in the first place in the BIOS, if it is not already there, then go to the Boot Menu (not in the BIOS), and simply boot from the installation flash drive. Of course, it’s not a fact that this method will help, but trying is not torture, you won’t lose anything from it. Boot Menu might look like this: 

This instruction will cover in detail all the steps of installing Windows 8.1 on a computer or laptop. We'll talk about clean install, not about .
In order to install Windows 8.1, you will need a disk with the system or a bootable USB flash drive with the system, or at least an ISO image with the OS.

After rebooting, installation will continue. First, you will be asked to enter your product key (if you have not entered it previously). Here you can click “Skip”, but keep in mind that you will still have to activate Windows 8.1 when finished.

The next step is to choose a color scheme and specify the computer name (it will be used, for example, when connecting the computer to the network, in your Live ID account, etc.)

On the next screen you will be asked to set the standard Windows 8.1 settings, or customize them as you wish. This is at your discretion. Personally, I usually leave the default ones, and after the OS is installed, I customize it according to my wishes.

The last thing you need to do is enter a username and password (password is optional) for your local account. If your computer is connected to the Internet, then by default you will be prompted to create a Microsoft Live ID account or enter the details of an existing one - address Email and password.

After all of the above is done, all you have to do is wait a little and after a short time you will see the initial Windows screen 8.1, and when you start working - some tips that will help you get used to it faster.
We still receive letters regarding questions about Windows 8, and more precisely transition from Windows 8 to Windows 8.1. To begin with, I propose to look at what’s wrong with Windows 8.1 and whether it’s worth upgrading. Regarding whether to update or not, definitely update, since Windows 8 is not a very successful Microsoft project (to put it mildly, not entirely successful), so they improved Windows 8 and made a big update operating system and called it Windows 8.1. In particular, with the new update, the long-awaited “Start” button appeared (although when you press it, the Metro interface opens, but still), it became possible to load the Desktop when you boot the computer by default (instead of Metro), in Windows 8.1 changes also affected the start screen, Now you can set four sizes of tiles on the start screen and much more...
In this article I will describe step by step, how to upgrade Windows 8 to Windows 8.1.
First, let me clarify some details about upgrading from Windows 8 to Windows 8.1:
1 Installing the Windows 8.1 update using the Windows Store is free and does not require any additional licenses.
2 Your files, classic apps, Accounts user and settings will be saved.
3 To install 32-bit Windows versions 8.1 will require 3000 MB, and for the 64-bit version of Windows 8.1 - 3850 MB of free space on drive C.
Knowledge bases should be installed in the following order: clearcompressionflag.exe, KB2919355, KB2932046, KB2959977, KB2937592, KB2938439, KB2934018.
Knowledge Base KB2919442 is a prerequisite for Windows 8.1 and must be installed before installing KB2919355.
Threat to computer security when working with the Internet, incorrect operation, driver failures and software- these are just a few possible problems upon refusal of system Windows updates. However, those who consciously take such a step as disabling Windows updates probably know what they are doing and why. In cases where system updates are not installed due to unwanted reasons beyond the user's control, it is certainly necessary to look for troubleshooting methods. Below we will consider those for the operating system Windows 8.1.
Finding the causes and ways to eliminate them for any problem in the operating system is in any case a risk. And, naturally, this applies to cases when updates are not installed on Windows 8.1. Even having found the right solution, on the way to a successful result we can accidentally make unwanted changes to the system settings. Therefore, before carrying out troubleshooting operations with updates, it would not be a bad idea to worry about the possibility of a rollback Windows changes. For these purposes you can create:
Any of the above options for system rollback, or creating a backup not using AOMEI Backupper Standard, but using any other third-party backup programs for Windows, will also prevent problems with system updates in the future. These, however, as well as instability in general Windows operation, may be the result of malware. Viruses, network worms and other malware can damage the integrity of system files. An antivirus cannot always cope with the recovery of infected files, therefore, if the cause of problems with Windows 8.1 updates is the activity of malware, the easiest way is to roll back the operating system - to the state of the restore point or backup copy. Ideally, to prevent problems with Windows 8.1 updates, it is advisable to add the presence in the system good antivirus with regularly updated databases.
Well, now let’s directly begin to consider the causes of problems with Windows 8.1 updates and how to fix them.
1. Enable the update service
The risk of problems with system updates is especially high when using 8.1. These are often pre-installed, at best, with the Update Center disabled, and at worst, with the Center system service stopped. In such cases, accordingly, the Update Center must be enabled and the system service must be started.
Let's check that Windows Update is enabled. Press the keys Win+X and in the menu that appears in the lower left corner of the screen, select “Control Panel”.
In the search field in the upper right corner of the control panel window, enter the key query “Update Center” and launch it.

The update center must be turned on - that is, configured to automatically download and install, download only, or at least just search for updates. If the only problem is that the system has the “Do not check for updates” option preset, there is nothing easier than changing this. Click “Settings parameters”.

And we install the appropriate option.

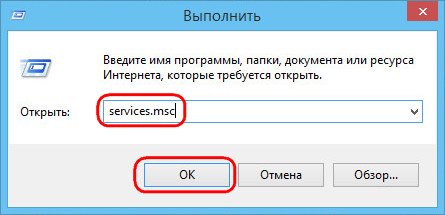
If the Update Center is enabled, the search for updates cannot be carried out due to the disabled service; therefore, you need to start the latest one. Press the Win+R keys to start the “Run” service and in its window enter:
services.msc
Click “Ok” or Enter.
The system services section window will open. At the very bottom of the list we find a service called “Windows Update”. Double-click to open its properties window.

Using the “Run” button, we start the service.


2. Troubleshooting using the standard Update Center recovery tool
A disabled Update service, along with other potential sources of update problems, can be identified as part of the standard Windows Update 8.1 repair tool. This tool diagnoses the system and automatically fixes problems. To launch it, go to the control panel again (keys Win+X and selecting the “Control Panel” menu item) and in the search field enter the key query “Troubleshooting”. In the search results, click the “Troubleshooting” section.

In the window that opens, in the “System and Security” section, click the link option “Troubleshoot using Windows Update.”

In the welcome window that launches the troubleshooting wizard, click “Next”.
Run as administrator.

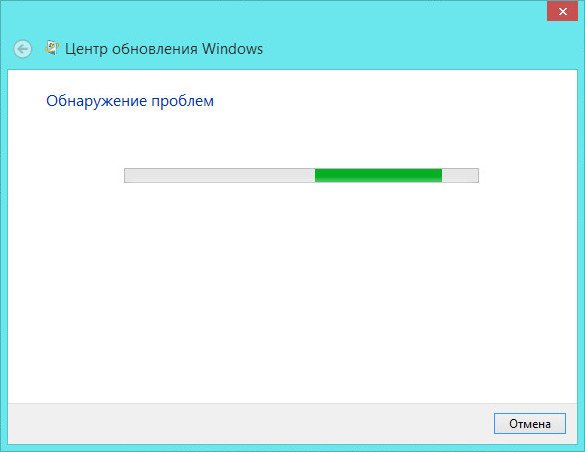
After this, the automatic process of detecting problems with the Update Center will begin.

Once completed, the troubleshooting wizard will display a progress report. Detected problems, if any, will be corrected automatically. We will see which of the Update Center problems may have interfered with its full operation in the “Detected problems” column.

Now all that remains is to manually start searching for and installing updates again. You may need to restart your computer.
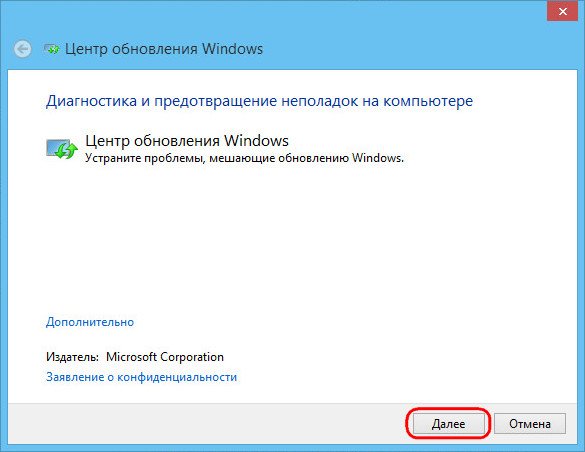
3. Windows Update Troubleshooter on Microsoft Site
If the standard Update recovery tool does not solve problems with Windows updates, you need to resort to another troubleshooting tool - an additional utility downloaded from the Microsoft website. The software giant for Windows 8.1 has developed something like a universal solution to problems with system updates, in particular, if errors 0x80240016 and 0x80240016 are indicated when trying to install them. When launched, the utility checks all possible causes and automatically corrects problems.

Let's launch it.


We are waiting for the problem detection process to complete.
As with the standard troubleshooter, at the end of the problem detection process, we will see a final window where the problems found and a mark about their automatic correction will be indicated.

That’s it – now we manually start searching for and installing updates. If problems arise again, repeat the search and installation of updates after restarting the computer.
4. Solving problems with updates when your computer is infected with viruses
Problems with system updates may be the result of viruses, network worms and other malicious programs. In particular, Windows Update errors such as 0x80240016, WindowsUpdate_8024401C, 0x8024401C, 0x80070490, in most cases arise precisely because of damage to the integrity of system files caused by malware. If any malware and it is after this that updates are not installed on Windows 8.1, the first step is, of course, to neutralize the source of the problem. The malware may have entered the system because the antivirus license has expired. In this case, you need to renew your license and run a global scan of your computer. A proven and reliable virus removal tool is the free one. It can be used in parallel with the antivirus installed on the system.
After neutralizing the malware, the next step is to restart the computer and determine whether important system files are damaged (or even destroyed). To diagnose and restore system files, we will use the standard Windows utility “sfc.exe” launched on the command line. The process of its work is described in detail in the article. The process of restoring the integrity of system files is also possible if Windows 8.1 does not boot after being infected by viruses. In this case it will help.
If, after restoring the integrity of system files, problems with Windows 8.1 updates do not disappear, you can try running the Windows Update troubleshooter downloaded from the Microsoft website, as indicated in paragraph 3 of this article.
5. Restart the update service and remove the update distribution
If none of the methods suggested above for solving problems with Windows 8.1 updates helped, restarting the update service and uninstalling the update distribution package may fix the situation. Update installation files downloaded with errors are not overwritten when downloaded again, and in order for the installation files to be downloaded again, their storage folder must be cleared. But first, let's stop the update service.
Press the keys Win+R and in the “Run” service field enter:
services.msc
Click “Ok” or Enter. In the window of the system services section, as in the first paragraph of the article, we find the “Windows Update” service and double-click to open its properties window. But if in the first paragraph of the article we started the service, now it is necessary, on the contrary, to stop it.

Without closing the service properties window, let's start cleaning the folder where update installation files are stored. This is the folder located along the pathC:Windows/SoftwareDistribution/Download. The easiest way to get to it is to press the Win+R keys and enter the folder path in the “Run” command field.

We delete the contents of the folder.


That’s it – we can reboot and try to start searching for and installing updates.
6. Lack of free space on the system disk
An infrequent cause of problems with Windows 8.1 updates, however, and it can occur is a cluttered C drive. To be sure to exclude this from the list of possible causes, it is necessary that at least 5 GB of free space remain on the C drive.
7. Blocking access to Microsoft web resources with an antivirus or firewall
Another possible reason why updates are not installed on Windows 8.1, in particular, the endlessly long and fruitless process of searching for updates, is the operation of an antivirus or firewall. These, with certain settings, can block access to Microsoft web resources. The easiest way to get ahead of this moment is to disable your antivirus or firewall while searching for and downloading updates.
8. Troubleshooting update issues in Windows Clean Boot mode
If all the methods discussed above for eliminating the causes of problems with Windows 8.1 updates have been tested, and none of the solutions have brought positive results, you can use something like a fallback option in the form of a clean mode Windows boot 8.1. You must perform a clean boot of the operating system, as indicated in the article.
Already in clean boot mode, you need to run the Windows Update troubleshooter downloaded from the Microsoft website and follow the same steps that were discussed in paragraph 3 of this article.
9. Also keep in mind that often the cause of Windows Update 8.1 not working correctly is damage to the system component store
You can restore a damaged component store very simply using the command Dism.exe /Online /Cleanup-image /RestoreHealth, .


