Installing Ubuntu Linux on a clean hard drive. Installing Ubuntu on an external HDD Installing Ubuntu on an external HDD step-by-step instructions
Initial data or what I had to start the installation:
- The actual Ubuntu distribution is ubuntu-11.04-dvd-i386.iso
- Netbook - Acer AO BGK-531h
- External HDD - Transcend Classic 320Gb
Actually what I wanted to do:
Install Ubuntu on an external HDD, and when you connect the HDD to any computer and set the BIOS to boot from this HDD, Ubuntu would load. And if you boot the computer without connecting this HDD, the OS installed on this computer would load.
The problem that I encountered and essentially which I am circumventing in this article:
During a normal installation (you connect an external HDD to the computer, boot through the Ubuntu boot distribution and install), the MBR (master boot record) of the computer is erased, Ubuntu installs its GRUB and then booting the computer without an inserted external HDD is not possible. I don’t rule out that there are ways to bypass this phenomenon, but at the moment I don’t know it, so I was looking for other ways to get around it.
So let's get started:
After googling and reading numerous forums, I realized that to install without overwriting the MBR on a computer, you can a) disconnect the computer’s hard drives, or b) install through a virtual machine. I decided to make do with software methods, and I didn’t want to turn it off; during installation I worked quietly and surfed the Internet. I chose VirtualBox 4.1.0 to create a virtual system, although in principle this segment is not very saturated, not even saturated at all, and it didn’t take me long to choose.
1. Install this program and launch it.
2. Create a virtual machine, with the OS type and version, it’s probably better to choose Linux and Ubuntu, respectively. Why? As far as I understand, then the keyboard and mouse work better in the window of this VM. Although, I could be wrong:
3. Because I had a netbook and it didn’t have a DVD drive, I had an 8GB flash drive, I didn’t have it at hand to create a bootable flash drive either, I first installed Alcohol 52% and created a virtual drive in it to load the Ubuntu installation image. Fortunately, the VM accepts it as a regular drive and easily launches the installation from it. Again, here we can say that I wanted to use completely software methods... Well, I didn’t want to look for a flash drive or an external drive + a DVD...
4. We start the virtual machine, at the first start it asks which host drive to use, select the drive that Alcohol 52% created and into which we have already mounted the ubuntu-11.04-dvd-i386.iso image. ii.. oops! The program installation window appears:

I won’t talk about the intricacies of installation, I’ll just note some points:
- When I first started the installation, when I got to the selection hard drive, where Ubuntu will be installed, I only had 1 disk there, the one that the VM launched. That is, the VM did not see the connected USB HDD. After looking through the settings, I found in devices-devices USB connection external HDD and checked the box, only after that it became possible to select an external HDD when choosing the location where the system will be installed.

- It is better to install Ubuntu in text mode. The usual installation, although in graphical mode, somehow I didn’t like it.
- And yet, a netbook is very unsuitable for running a VM. Everything is done slowly and for a long time... there is not enough power, so I did not wait and repeated the entire procedure on a normal computer.
As a result, we have an external HDD with Ubuntu OS, which can be connected to any computer, boot and work, while all data will be saved.
If you want to have a portable flash drive or external HDD with , then there are at least two options:
- install the system on a flash drive
- (permanent storage)
The first option is similar to a regular operating system installation. But since we will install on a flash drive, we get portability - the ability to boot on any computer with a USB input. All changes made to the system are saved after reboot. In general, the work is not much different from working with a regular computer.
The second option is to create Live systems on a USB drive (the same flash drive). But since the Live system is not capable of saving changes (user files, system settings), another partition is additionally created for it, on which files and settings made are saved. That is, it would seem that it turns out something like the first option - there is a system that “remembers” the changes made after a restart. In fact, there are some nuances.
Live system with persistent itself takes up less space - the same as the downloaded ISO image - i.e. usually up to four gigabytes. The operating system installed in the usual way takes about 13-15 gigabytes. But a normally installed system will boot faster because Live uses compression. A live system with persistent may encounter a problem where the new kernel (which can be updated) is incompatible with the old bootloader (which is part of the Live image and is not updated).
In general, both methods deserve the right to exist, and both of them will be discussed on the pages of the site. This tutorial will show you how to how to create a flash drive with Kali Linu installed x. A detailed procedure will be described to avoid some problems that may arise when installing the system on a USB drive or when booting from a USB flash drive or external drive.
Features of installing Kali Linux on a memory card
Installing on a USB flash drive is similar to installing on an internal drive. But in order not to accidentally damage the main computer system, computer hard drives or the main system boot loader, I suggest installing Kali Linux on a USB flash drive in a virtual computer. After this installation is completed, you will be able to boot from this flash drive on your real computer. I use .
I assume that you already have VirtualBox installed, or you know how to install it yourself.
In VirtualBox, create a new virtual computer. The most common virtual computer for Linux. The only difference is that it does not have to have a (virtual) hard disk. If you have difficulty creating virtual machine in VirtualBox, or if you have any difficulties with other issues related to VirtualBox, then refer to the instructions “”, where this is described in detail and illustrated with screenshots.
When, in the process of creating a new virtual computer, you reach the window HDD, then select " Do not mount the virtual hard disk»:
Once the virtual machine is created, launch it. Official releases (not weekly automated builds) are recommended as ISOs. When trying to use the weekly builds, I was getting errors that the kernel modules couldn't be loaded and the installation was failing.
USB flash drive for Kali Linux
For Kali Linux, as well as for any modern Linux distribution I recommend memory cards larger than 16 gigabytes. Those. that's 32 gigabytes or more. The higher the speed, the better. Flash drives are not suitable for multiple simultaneous read/write operations, and OS They work exactly in this mode. Even with a good memory card, your system will work noticeably slower than a desktop one; it may lag and slow down. With a bad (slow) memory card, work can become difficult and uncomfortable.
How long do USB flash drives with an installed operating system last?
I am one of those who do not spare my media. I download torrents on my memory cards in my phone, I install operating systems on my USB flash drives, use them intensively, and often make and restore full backups. I haven't had a single memory/USB card break due to heavy use. Honestly, I think it's a myth that memory cards can get damaged due to frequent use. Maybe I'm just lucky. I want to say that USB flash drives (at least some) can “live” for years and be used with operating systems installed on them.
Cleaning a USB memory stick to install an operating system
Before starting the installation, I recommend completely erasing the data from the flash drive (remove GPT), because otherwise I sometimes encountered errors with a problem writing to the disk. We will do this using the Live system itself, booting from the downloaded ISO.
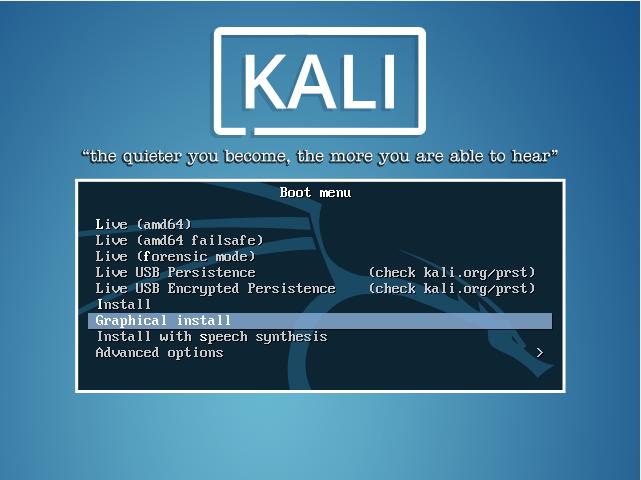
When this menu appears, instead of selecting “Graphical installation”, boot into the system.

When you boot into the bottom bar of the virtual machine, connect your USB flash drive to the system:
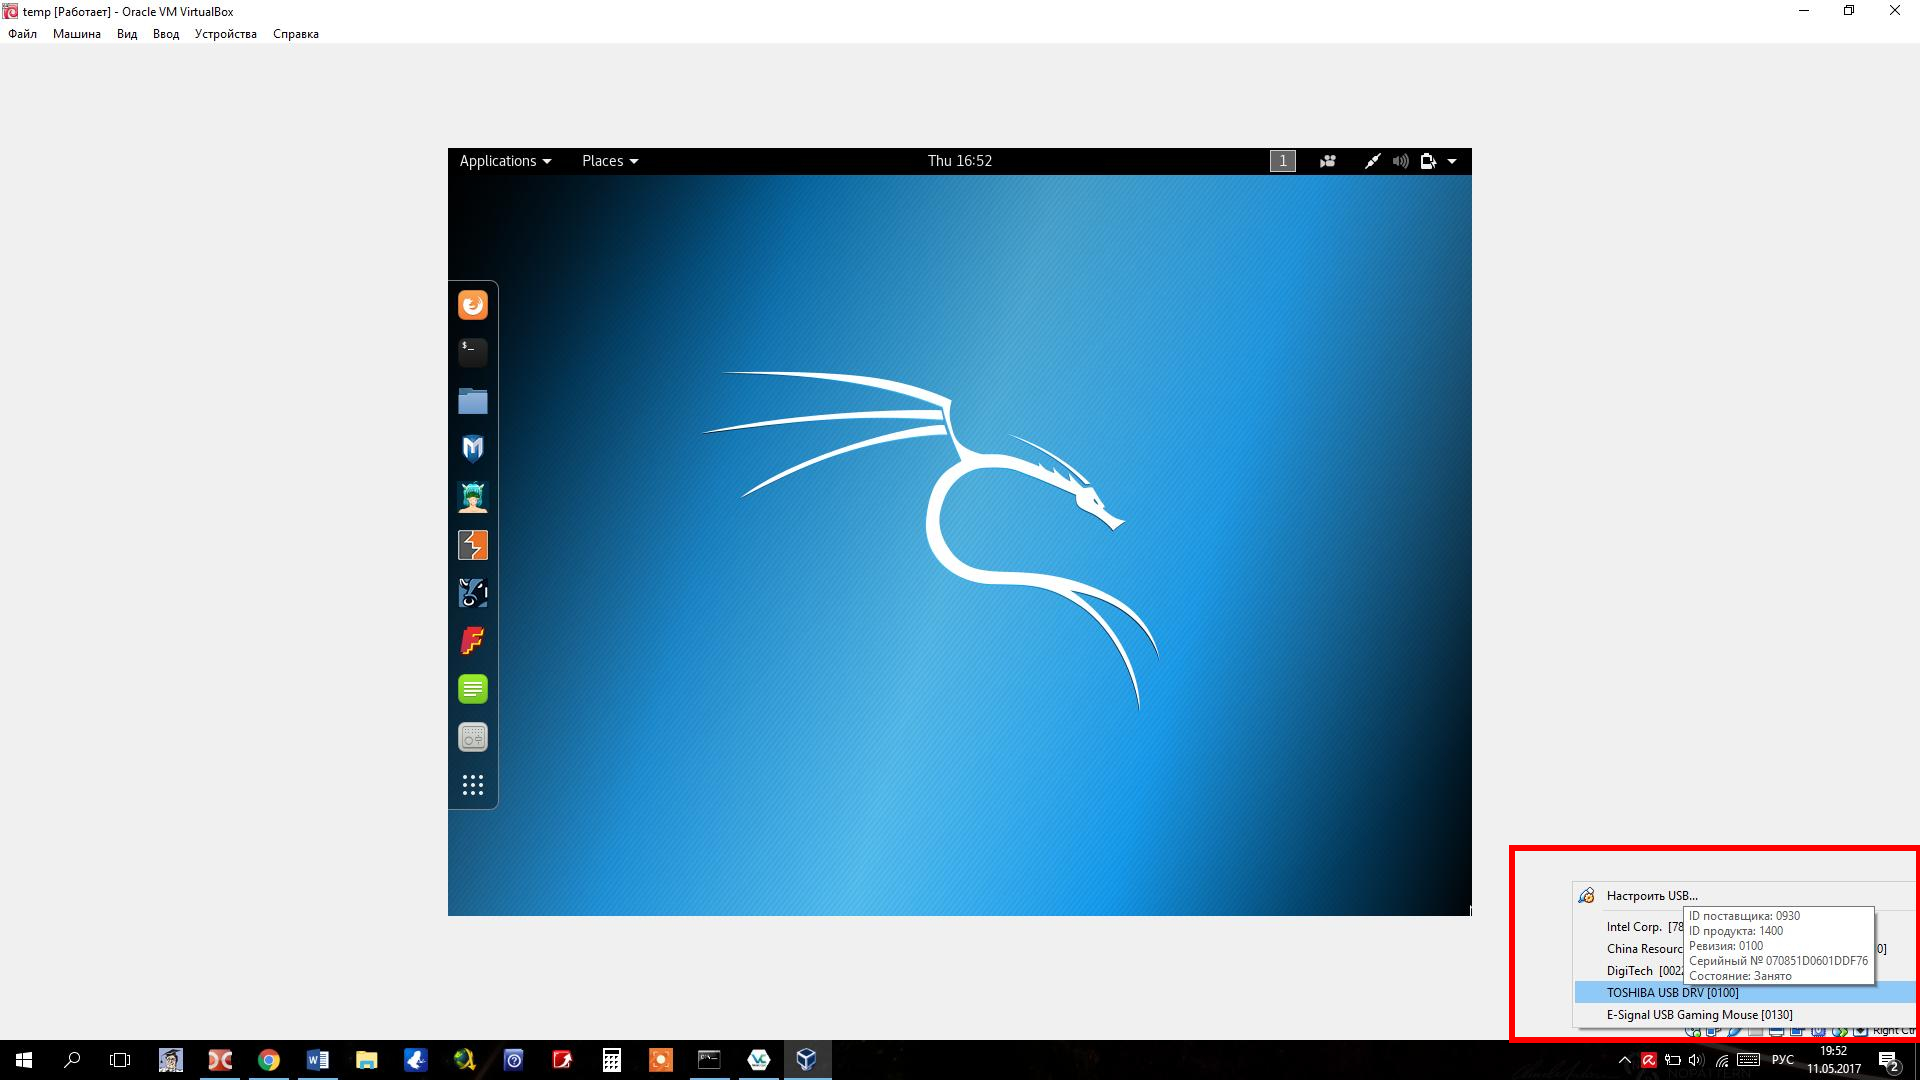
You can look at the list of disks, but since there are no other media (hard drives) there, you will only see a flash drive under the name /dev/sda:
Fdisk -l

To remove GPT from the disk, if it is there, run:
Gdisk /dev/sda
To switch to expert mode, enter
Then to remove GPT enter
Agree twice to completely clear the drive.

Now our flash drive is cleaned, without removing it, reboot the virtual system. Now from the menu select " Graphical install»:
Instructions for installing Kali Linux on a USB memory stick
There are no differences from installing the operating system - everything is quite standard, the choice of language, username, etc. If you have problems with this, then, again, refer to the “” note.
Perhaps there is only a small nuance with the swap partition. We do not need a swap partition on the flash drive at all - we will use the computer resources directly, i.e. all RAM- this should be completely enough. But even if this is not the case, the swap partition on a flash drive will only do harm, since it will be very slow. To prevent the creation of a swap partition, when you go to " Disk partitioning» select the item « Manually»:

Select a section:

Select “Yes”:

Select “FREE SEAT”:


In the next window, most likely, you won’t have to change anything:

Select “Primary”:

Select “Partition setup complete”:

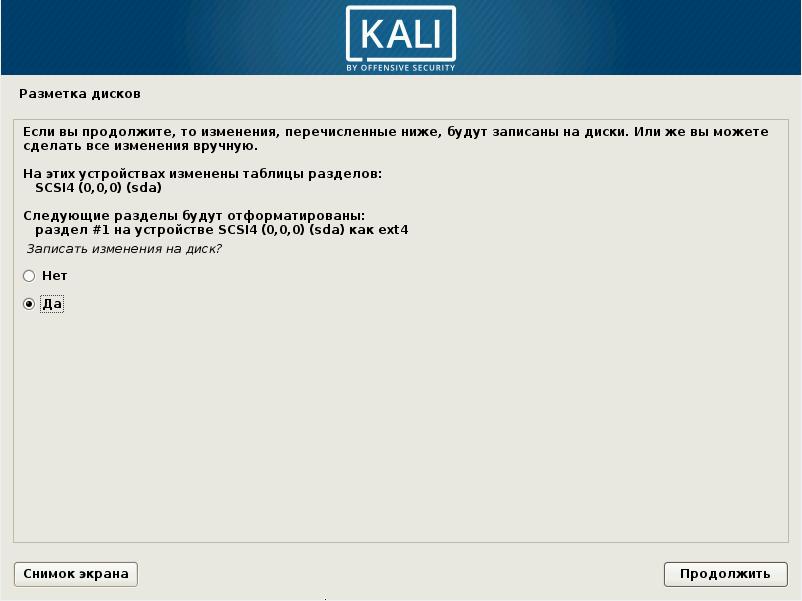
Select “Finish partitioning and write changes to disk”:

The system complains that no partition for swap space is specified and praises it in every possible way. In our case (installing the OS on a flash drive), it is really not needed. Select “No”:

Now select “Yes”:
After this, the normal installation of Kali Linux OS will begin.
Leave it unchanged here:

Select your flash drive:

When the installation is finished (and this may take longer than you expected, since flash drives are not as fast as even regular hard drives, not to mention SSDs), then turn off the virtual computer. You can reboot your real computer to boot from the system freshly installed on the USB flash drive.
Booting Kali Linux from a flash drive
If you do not have UEFI, then when the computer starts booting, press the Delete or Esc button many times (sometimes a different one, depending on the model motherboard- you can find this out on Google). In the BIOS, where “Boot Order” is selected, select your flash drive. The flash drive must be inserted into the computer at this moment, otherwise the BIOS will not see it. If the flash drive is inserted, but the computer does not see it, try inserting it into different slots and reboot each time and go to the BIOS.
If you have UEFI, then you can’t just get into the BIOS. The easiest way to get into the BIOS is to enter command line(on behalf of administrator):
Shutdown.exe /r /o
After this, a message will appear that the computer will restart in less than one minute. After the reboot, we get here and select “Diagnostics”:

Now select “Advanced options”:

Now "UEFI Firmware Settings":

Well, “Reboot”:

Different manufacturers have different BIOSes, so yours may be different. But I’ll show you an example of my laptop so that the essence is clear. Go to the Boot tab, select Boot Option Priorities, see what options there are:

There is only one option and I definitely don’t have my flash drive.
We look for Secure Boot and disable it (Disable):

A new menu item OS Mode Selection appears. In it we select CMS and UEFI OS. If you select only CMS OS, then installed Windows will not load.

Now we look for an item such as Fast BIOS Mode and disable it (Disable). This is necessary so that when loading the BIOS it starts checking for the presence of USB devices:


But we need to go to BIOS again! Therefore, when loading, press the appropriate key. My key is F2. On the old computer, this key was Delete. The BIOS writes this key itself when the computer boots. If you don’t have time to look or don’t understand English, then look for your model on Google. Or try the brute force method. In addition to those mentioned, this key can also be Esc or some F*.
Go to the Boot Option Priorities tab again. Now there is a flash drive there. If you do as I did - put the flash drive in first place, and Windows Boot Manager in second place, you will achieve the following effect: if the flash drive is inserted into the computer, then Linux will boot from this flash drive. If there is no flash drive, then Windows will boot - and there is no need to go into the BIOS again!

Don't forget to save and reboot.
Solving the problem “the disc contains an unclean file system”
When booting Linux you may encounter an error:
The disc contains an unclean file system (0, 0)

This error appears especially often when trying to boot from a USB flash drive or external drive. The reason for this is that GRUB's settings point to the wrong disk, e.g. Windows disk. The system does not understand the disk file system and cannot continue booting. This problem can be solved quite simply.
Restart your computer and when the menu appears GRUB bootloader press the key e. You will see something like this:

Notice the line starting with linux. In my case there is an entry
Root=/dev/sda1
Since during installation in the virtual computer there were no other storage media besides the flash drive, it was given the name /dev/sda1. A real computer has at least one other hard drive, and the name /dev/sda1 could be assigned to it. And the flash drive I'm trying to boot from now has a different name. This name could be /dev/sdb1, or /dev/sdc1, or something else (depending on the number of disks in the system).
If you don't know the new name, just try different options. Move the cursor to the disk name and change it to /dev/sd b 1. After that, press the key F10 and wait for it to load. If the download is unsuccessful, then restart the computer and change the entry to /dev/sd With 1 (and so on alphabetically), press F10 and check whether the download was successful.
After successfully loading into the system, change the name of the boot disk. For example, in my case the disk name turned out to be /dev/sdс1(with letter c). Then the command to change is boot disk will look like this:
Sudo grub-install --recheck /dev/sdc sudo grub-mkconfig -o /boot/grub/grub.cfg
Instead of /dev/sdc Substitute the name of your disk or flash drive.
Now, when rebooting, an error will not occur, and I will immediately get into Kali Linux installed on the flash drive.
Backing up a flash drive with Kali Linux
Installing an operating system on a flash drive, and especially its subsequent configuration and installation of programs, is a lengthy process. In case the flash drive does break or you need it to write down your coursework, you can make a backup copy of it. It is also recommended to make backup copies before installing video drivers or other similar experiments that are dangerous for the OS.
If we are talking about creating a backup of the OS and not individual files, then the best option is to clone an image of the entire disk. If necessary, this will allow you to very quickly return the entire operating system with all settings. The disadvantage of this method is that the backup image will take up exactly as much space as the capacity of the flash drive. Even if, for example, the operating system with all the files takes up only half the volume of the USB drive, the image will still be the size of a flash drive. As already mentioned, the advantage is that you do not need to select files for synchronization, all backup copy stored as a single file, restoration guarantees a complete return to its original state.
IN Linux systems a similar image can be made using the program dd, and for Windows there is a wonderful free, open source utility.
Launch Win32 Disk Imager as Device select your flash drive, and in the field Image File write down the path where you want to save the image:

When ready, click Read.
If you need to restore the operating system to a flash card, then similarly select the image that you want to write to the flash drive and click Write.
Conclusion
This instruction showed in detail how to install Kali Linux on a flash drive, described possible problems and ways to solve them. In fact, you can install it this way any Linux on a USB memory stick. This will show you how to create a Kali Linux USB memory stick with persistent(permanent storage).
If you need to view files located on a flash drive from the main Windows systems, then refer to the instructions "".
Installing Linux to an external hdd and got the best answer
Answer from Living creature[guru]
There are no problems there... install Linux on any free partition, and use the external hard drive as file storage...
Answer from 2 answers[guru]
Hello! Here is a selection of topics with answers to your question: Installing Linux on an external hdd
Answer from Mike[guru]
Low USB speed says it all.
Answer from Vladimir[guru]
You can put it next to it and select the OS when loading. Look at Ubuntu, it’s easy to install next to Windows
Answer from Vitaly Shiyan[guru]
I'm having problems with my laptop right now, but not software problems. The laptop was purchased in 2008. The disk is only 120GB, that is, actually 112GB. In addition to seven, I installed Linux Mint - I just allocated 20GB for it and that’s it. No problems. When starting the system, you need to choose which system to start -default Linux starts. There is another Linux recorded on a flash drive, with the ability to save all changes. So you can divide your external drive into partitions - for the operating system and for storing files - and use it calmly. You can install several Linux systems on an external drive.
Answer from Yocorpion[guru]
You can install it, the speed of USB 2.0 is of course a little low, but it’s enough for familiarization, besides, then this already configured and lived-in OS can then be cloned anywhere,
Answer from Pavel Petrov[guru]
So, in order...
1. “For familiarization” and “to dig deeper” - the so-called. LiveCD/DVD/USB. For many distributions (like Bubunta), you can boot into LiveCD mode from a regular installation disk. You can download several different ISO images from different distributions, burn them to media and boot into LiveCD mode - see what you like best.
2. If you really want, you can record it on an external USB/HDD as a full-fledged OS. here are 2 links about Bubuntu on this matter: link and link With other distros - the same. Quite fair comments about the low read/write speed on the USB bus.
3. Can be installed as a 2nd OS. Most of the modern “friendly” distros are installed quite easily; loading 2 or more operating systems is configured almost automatically. After removing Linux, you will need to restore the Windows bootloader.
This March 2016, Ubuntu 16.04 Xenial Xerus is not yet released. It's still under development so it's not stable for daily use, but you can download this development version. This guide is for installing any version of Ubuntu on an external hard drive, not just 16.04. But since 16.04 is becoming a hot topic today, we are using 16.04 as an example. Note that installing any external GNU/Linux on an external hard drive is a little different because you have to pay attention to where to install the bootloader and be prepared to bail out when you can't boot normally.
System Information
We use this computer to perform these installation procedures:
- ASUS X44C Intel Celeron 2 GB RAM
- One internal hard drive 320 GB
- One external hard drive 320 GB
- Internal hard drive contains one operating system with GRUB boot loader
- The external hard drive is empty, does not contain an operating system and does not have a bootloader
Plan
We want to install Ubuntu 16.04 on an external hard drive, on the second partition (/dev/sdb2) and install the GRUB boot loader on that external hard drive (/dev/sdb). Please note the device numbering scheme.
The plan we want is to make sure that the external hard drive with the operating system inside can be booted on any other computer since it already has its own boot loader. We don't use our internal hard drive boot loader, although we can, because we want each hard drive to have its own boot loader.
ISO preparation
Preparing the Disk
We don't restrict your freedom to partition your own drive. We are simply giving you an example, one of the most simple circuits sections (at least for us). We have a 320 GB external hard drive, we have an MBR partition table (not GPT) and we divide it into 10 partitions with the scheme:
Info: As you may know, the MBR partition table only allows a maximum of 4 partitions if they are all primary. If we want to install more than 4 operating system (more than 4 partitions), we can create 3 primary and 1. Then we can create any number of logical partitions inside the extended partition. That's why you see 1 extended and 6 logical partitions above. Using this scheme, we can have 10 partitions on an MBR hard drive.
Preparation of installation materials
Installation media is any storage that you will use to install the OS. This could be a CD, DVD, USB drive, hard drive, or even a network. Today, the USB drive has become a common medium for installing any GNU/Linux distribution. It's cheaper than CD (because you can burn ISO whenever you want), easier and faster. You must create installation media to install anything.
To burn the Ubuntu ISO to a USB flash drive, according to your current operating system:
- On GNU/Linux you can use the Unetbootin program. But if you are currently using Ubuntu, it already has a Startup Creator program for burning Ubuntu ISO to USB drive.
- On Windows: you can use the Universal USB Installer (GNU GPL 2).
1. Download installation media
We assume your media is a USB flash drive. Insert media > reboot > enter BIOS > set BIOS to boot to USB drive > save > reboot. This will boot the operating system inside your media. Ubuntu will boot from there and finally give you a user interface to choose between Install and Live. Select "Live".
2. Open the Ubuntu installer (Ubiquity)
In a Live session, you can see the "Install Ubuntu" icon on your desktop. Double click it and Ubiquity (OS installer). The first page you'll see is the welcome screen, which asks you which language you prefer. We recommend that you use English.
3. Pre-separation
In the pre-partitiong stage, you will see several steps:
- Wireless: You will be asked to use any connected wireless network, be it WLAN or LAN or whatever. We recommend that you don't connect to anything, so select "Don't want to connect." Next.
- Preparing to install Ubuntu: You will be asked to do two things: download updates automatically and install a third party software. We recommend that you don't download anything, so don't select anything. Next.
- Unmount Partition: You will be prompted to unmount (unmount) some partitions that are still mounted (attached) to your system. Because you must unmount the partition if you format it. Select Yes. Next.
- Installation Type: You will be prompted to select a partition type. Don't choose anything other than Something Else. Warning: Choosing any other option may result in the destruction of all your data on your hard drives. Don't trust automatic partitioning. Next.
4. Marking
Warning: It is very dangerous to partition or format any hard drive. To do this, you must not be in a sleepy state, you must pay attention and concentrate, otherwise you may destroy all data on all hard drives.
The first thing you need to pay attention to is to find where your hard drive is and where your target partition is. We mentioned that our target is the /dev/sdb hard drive and the /dev/sdb2 partition. But you should pay attention, sometimes, Ubiquity reads /dev/sdb as /dev/sda. Here our /dev/sdb reads as /dev/sda, so our target here is the /dev/sda2 partition. You must correctly identify where your target partition is.
Using shortcut names, making the size of the partitions different, making the partition filesystem different, or ideally ensuring all empty partitions (like we did) helps a lot to ensure we're not making mistakes here.
At this point there are several formatting steps to follow:
- Select the target partition entry, for example /dev/sda2.
- Click the "Change..." button.
- Do not resize the partition since you have already formatted it previously to be that size.
- Change the file system to ext4.
- Change the mount point to "/" (slash). This means the root file system, the highest point of your operating system partition.
- Check the Format of this partition (optional) to ensure that all data inside /dev/sda2 will be deleted.
- Click OK.
- Please wait while Ubiquity prepares the partition of your choice.

Then you'd better create a swap partition:
- Select the empty section you have prepared. You will need 2 to 4 GB just for sharing.
- Click the "Change..." button.
- Change the file system to swap.
- Or select an empty partition, click Edit..., then resize anything larger than 4 GB to 4 GB or just 2 GB. You don't need 8, 10 or even a 40 GB replacement.
Then you have to enter the bootloader installation steps:
- Download Installer field:. It is located at the bottom of the Ubiquity split screen.
- Select the name of the hard drive where the partition is located. In this case, since the partition is /dev/sda2, you should select /dev/sda (hard drive). Installing the bootloader on the hard drive (not the partition) helps you recognize all the operating systems inside the hard drive, not just the one on the partition.
Then, if you have re-checked them and you are sure, click "Install Now".
5. After separation
After clicking the "Install Now" button, the installation begins and starts when you enter this stage with the following steps:
- Select your country's country. Next.
- Select your keyboard layout. For most users, the default selection is safe. Next.
- Select your username, password, and computer name. Next.
- Wait while Ubiquity installs.
- Once you're done, you'll be asked whether to continue testing (LiveCD) or restart now.

Installation completed. You can now enjoy the new Ubuntu 16.04 operating system.
6. recovery
In some cases you won't get a normal bootloader if you can select one operating system and just press Enter to boot. Sometimes you can't. Because, sometimes GRUB failed to install itself on the external hard drive. If this happens, you will only find the GRUB prompt, where you must enter a few commands to automatically boot the operating system. It's hard if you don't know what command to type, but it's pretty easy if you know how to do it. We have prepared an article for this condition: Booting GNU/Linux manually using the GRUB command to enter the operating system on an external hard drive.
Original: "Ubuntu Hacks: Chapter 1 - Getting Started"Authors: Kyle Rankin, Jonathan Oxer, Bill Childers
Publication date: June 2006
Translation: N. Romodanov
Translation date: July 2010
You can install Ubuntu system, load it and run it completely from a FireWire device, USB, or other external drive, but it does require some special setup. Below we will describe the process of such setup from beginning to end.
While writing this book, we realized the main disadvantage of using a laptop as a primary computer: it is much more difficult to replace hard drives when testing systems. We needed to set up our Ubuntu system so that we could test various tricks and specific system settings, but if we could, we didn't want to repartition the main laptop hard drive and reinstall the system. We decided to install the Ubuntu system on external media and run it from there; this way, the regular system remains untouched, but we can start the Ubuntu system whenever we need it.
Unfortunately, this installation option will not automatically work without some configuration due to several reasons:
- By default, the initrd (initial ram disk) file used by Ubuntu does not contain the drivers required to boot from an external device. Your BIOS will detect your device without issue (provided it supports booting from removable drives), but once the kernel is loaded, Linux will not be able to detect and mount the drive to continue the boot process.
- Even if there are appropriate drivers in the initrd, the kernel will take a few seconds to load those modules and detect the removable disk before it tries to use them. During this time, the system will most likely try to boot and will not be able to find the removable disk, since its configuration will not be completed by this time.
- The Ubuntu installer is very useful in that it tries to detect other operating systems that you may have installed on the system, and for each OS it adds an entry to the GRUB boot loader. Unfortunately, this means that each OS must reside on the internal hard drive, which is the first drive listed in the BIOS, while the removable drive will be the second (or third or fourth if you have other drives in the system). When the BIOS boots from a removable drive, it will be configured as the first drive in the system, which will cause problems in GRUB.
In this section, we'll look at how to solve each of these problems so that you can install Ubuntu on a removable drive and boot from it.
Setting up disk partitions
The first step is to start the Ubuntu installation process exactly the same as with any other installation option, so follow everything you read about in the "Installing Ubuntu" section [Tip #5] until you reach the stage of repartitioning the disk to sections. When Ubuntu goes to disk partitioning, note that the default will probably be one of the system's internal IDE or SCSI drives. If your system uses an IDE device, you can select an external drive by specifying a SCSI drive detected by the system. The drive specific string will probably be "SCSI (0,0,0) (sda)". If you already have a SCSI drive in your system, then finding the USB drive will be a little more difficult, but most likely it will be the last SCSI drive listed in the system.
Warning
You must be absolutely sure that you have selected the correct drive at this point, as Ubuntu will format and repartition the drive you select and delete any data that may have been on it. If you don't know which drive to choose, boot from using Ubuntu Live CD and check the device names ( sda, sdb etc.) assigned to various drives on your system.
Installing GRUB
Once you select the appropriate device to format, continue with the Ubuntu installation process until you reach the stage of setting up the GRUB bootloader. Here you will be asked if you want to boot GRUB onto your internal hard drive into the MBR. You should not do this as it will overwrite the bootloader that is being used on the system. Instead, answer No and in the next window that appears, specify /dev/sda (or whatever Linux device name is assigned to the removable drive) so that you can install GRUB directly to the removable drive.
Using chroot
Then we continue the Ubuntu installation process until you are prompted to select Continue and reboot the system. Before you reboot, you will need to make a few settings on the system. The Ubuntu installer actually allows you to log into a main console, which you can use to run some limited commands on the system. Press Alt-F2 to navigate to that console and then press Enter to activate it.
Now you need to prepare the removable drive, so you can use the chroot command and change some files. In fact, the removable disk will be mounted in the /target directory, and the first step is to mount a special file system/proc:
# mount -t proc /target/proc
You can now use the chroot command to turn the /target directory into a functioning system partition. This way you can run commands as if you had booted from this disk:
#chroot/target
Setting up initrd
Once the command is executed chroot, the first thing you need to do is add those Linux modules that will make your removable drive accessible to initrd. The /etc/mkinitramfs/modules file is where you specify additional modules to be added to the initrd, so use a console text editor of your choice and edit this file. If you don't have a favorite console text editor, just use the editor vim(if you are unfamiliar with vim, then look in the "Editing Configuration Files" section [Tip #74] for examples of use vim):
# vim /etc/mkinitramfs/modules
Once this file is open, go to the very end of the file, add the following few lines, then save your changes and close the file:
Ehci-hcd usb-storage scsi_mod sd_mod
Clue
If your removable device is connected via an IEEE1394 connector, then also add the following line:
Ieee1394ohci1394sbp2
and for other devices - just add to this file those modules that are needed for these devices.
Once the modules are configured correctly, the next step is to configure the initrd daemon to wait a few seconds before continuing to load. This gives Linux time to detect and configure the removable drive. Open in text editor file /etc/mkinitramfs/initramfs.conf:
# vim /etc/mkinitramfs/initramfs.conf
To force Linux to wait a few seconds before completing the boot process, now add a new parameter to the very beginning of the file
In our experience, ten seconds is plenty of time to boot Linux from a USB drive, but you can change this to a higher or lower value if needed. Save your changes and close the file.
Now you can use a special tool mkinitramfs recreate the file initrd, in which new settings will already be added:
# mkinitramfs -o /boot/initrd.img-2.6.15-16-386 /lib/modules/2.6.15-16-386
Change the initrd.img and /lib/modules paths to match the kernel version used on your installation CD.
Changing the GRUB setting
The last step is to change some settings in the GRUB configuration file. The Ubuntu installer configures the external device (or the second drive specified in the BIOS) as device hd1, but you need the external drive to be device hd0 since this device will be the first system device in the BIOS when it boots. In a text editor, open the GRUB menu.lst file:
# vim /boot/grub/menu.lst
and find the lines that concern the GRUB root device. They will look something like this:
## default grub root device ## e.g. groot=(hd0,0) # groot=(hd1,0)
Change the last line to point to the hd0 device:
## default grub root device ## e.g. groot=(hd0,0) # groot=(hd0,0)
Title Ubuntu, kernel 2.6.15-16-386 root (hd1.0) kernel /boot/vmlinuz-2.6.15-16-386 root=/dev/sda1 ro quiet splash initrd /boot/initrd.img-2.6.15 -16-386 boot title Ubuntu, kernel 2.6.15-16-386 (recovery mode) root (hd1,0) kernel /boot/vmlinuz-2.6.15-16-386 root=/dev/sda1 ro single initrd /boot /initrd.img-2.6.15-16-386 boot title Ubuntu, memtest86+ root (hd1,0) kernel /boot/memtest86+.bin boot
Title Ubuntu, kernel 2.6.15-16-386 root (hd0,0) kernel /boot/vmlinuz-2.6.15-16-386 root=/dev/sda1 ro quiet splash initrd /boot/initrd.img-2.6.15 -16-386 boot title Ubuntu, kernel 2.6.15-16-386 (recovery mode) root (hd0,0) kernel /boot/vmlinuz-2.6.15-16-386 root=/dev/sda1 ro single initrd /boot /initrd.img-2.6.15-16-386 boot title Ubuntu, memtest86+ root (hd0,0) kernel /boot/memtest86+.bin boot
If Ubuntu has detected and created a configuration for other OSes and you want to take advantage of this as well, simply make the same changes to the configuration parameter for each OS root- just replace hd0 with hd1 . Then save your changes and close the file.
You can now exit the chroot command mode, so type exit at the console and then press Alt-F1 to return to the main Ubuntu installation console. You can now select the Continue option to reboot the machine and start the installed system.
Clue
Keep in mind that most computers cannot be set to boot from a removable drive by default if they have a CD-ROM or other hard drive. Some BIOSes have the ability to set a setting so that when you press a special key during boot (for example, F12), you can choose which device to boot from. In other BIOSes, you may need to press one of the Esc, F2, or Del keys to enter the BIOS and configure the boot order of devices.


