Installing Windows 7 from a flash drive step by step instructions. Installing Windows from a flash drive via BIOS. Find a ready-made boot disk or flash drive
The next article will be about how to burn and install Windows 7 from a flash drive. This is a really relevant way to install today Windows 7, since it’s much more convenient with a flash drive than with a disk. In order to install Windows 7 from a flash drive First you need to create a bootable flash drive from which we will do the installation operating system.
To create a bootable USB flash drive we will need:
1. Image of the operating room Windows systems 7
2. Flash drive at least 4GB
3. Windows 7 USB/DVD Download Tool, download.
Create a bootable USB flash drive:
1. Format the flash drive. Be careful, as formatting will delete all data from the flash drive. Go to “My Computer”, right-click on our flash drive, select “Format” and where the file system is, select NTFS and click “Start”
2. Launch the Windows 7 USB/DVD Download Tool program.
3. Click on “Browse” and Select the disk image. I will say that it doesn’t have to be Windows 7, XP is also possible.


5. Select the flash drive you want to burn Windows 7 to and click “Begin copying”

6. That's it, all that remains is to wait until the creation of the flash drive is completed to install Windows 7.
Now you will always have a flash drive with which you can install the operating system. All new computers support installation from flash drives, you just need to select a special boot item in the BIOS. , and continue. Good luck!
This article will discuss how to install Windows Vista or Windows 7 from a flash drive but any computer, laptop and netbook. In addition to a flash drive, you can use any memory card and external card reader.
Brief description of installing Windows from a flash drive
In this article you will learn how you can install Windows Vista and Windows 7 on your computer using a flash drive or memory card. This manual is primarily written for those people who are new to working with computers.
Of course, where easier than Windows install using a regular DVD disc, but this is not always possible. And there may be several reasons for this, starting with the fact that your computer or laptop does not have a DVD drive and ending with the fact that this DVD drive is broken, or you may simply not have a disk with Windows.
And so, if you have one of the above problems, then you can install Windows using a flash drive or memory card, for this you will need to write Windows to an external drive, and then install it safely. In fact, this is what this article will discuss.
Installing Windows Vista and Windows 7 from a USB flash drive
Before you start installing Windows Vista or Windows 7, you should copy all important data from the partition on which you plan to install it; these files can be copied to another partition, to a flash drive, or to any other computer. It should be remembered that desktop elements, programs and documents in the system are located in different sections. Why do we copy files? In order not to lose them. Because if we start clearing space for our Windows, we will need to format the partition where Windows will be located, and this will lead to the irrevocable destruction of files.
In addition, before installing Windows you will need to copy all the necessary drivers (this mainly concerns network card, modem and Wi-Fi adapter). This procedure is necessary in order to avoid problems that may arise after installing Windows. And the problems may be of the following nature: the version of Windows that you install may simply be missing some drivers, and it’s okay if these are drivers from the video card, but if these are network drivers, then you will lose the opportunity to log on to the network and download the drivers you need, and this, as you yourself understand, is an unpleasant development of events.
The entire process of installing Windows Vista and Windows 7 can be divided into five main stages:
- Actually preparing the flash drive itself for loading Windows 7 or Windows Vista on it.
- Settings Laptop BIOS, which will allow you to boot Windows from a flash drive or memory card.
- Direct installation of Windows.
- We look for and then install drivers.
- Installation software and utilities.
Let's look at each of the stages.
1. Preparing a flash drive
And so, now you will learn about three ways, which will help you burn the Windows distribution kit to a flash drive. It should be said that the first method is simpler than the second, but more difficult than the third.
Method number 1
To do this, we need a Windows OS distribution, which is best used in the original MSDN assembly. Why MSDN assembly? Because there are a minimum number of problems with it, both during installation and in further use.
After that, we will need a set of utilities that you can find on the Internet. And, of course, the flash drive itself is larger than 4 GB. In this case, it is better to use a flash drive with a memory card. This way you can avoid problems that may arise if your netbook or laptop does not have the ability to boot from a memory card in the built-in card reader.
Before installing Windows, find out which version your laptop supports. Because it can support either 32-bit or 64-bit version.
Let's get started! First, you should copy the image of your Windows (Vista or 7) to the hard drive, and the format should be ISO. Then we launch the UltraISO program, which you must download and install on your computer. After this, the main program window will open in front of you.

If your UltraISO program requires payment and you do not have a tablet, then select “Trial period”.

After this, you will need to open the image of your operating system. To do this, click on “File” and then “Open”.

Find the folder where the system ISO file is located.

Go to the boot menu and select “Burn hard disk image” from the list that appears.
Now insert the flash drive or memory card into the USB port on your computer or laptop.

After that, click on the “Format” button.
Remember that during the formatting process, all the data that was on your flash drive will be lost forever, so if these files are of particular value to you, copy them to some kind of media or computer.

After you clicked format, you will need to select the file system type (NTFS) and then click the “Start” button.

Warning about data deletion.

After some time, formatting will be completed.


Warning. Click “Yes”.

Now you need to be patient and wait. Once recording is complete, you will have a flash drive or memory card with Windows worker 7.
Method number 2
Using this method, we will need a Windows distribution, a flash drive with a capacity of more than 4 gigabytes, or a memory card with the same capacity.
Remember that before you start formatting a flash drive or memory card, you should copy all the files that are important to you from it, otherwise they will all be irretrievably lost.
Let's start work. The first step is to insert a memory card or flash drive into the USB connector, after which you need to launch the “Command Prompt”, which can be found in the “Start” menu.

It looks like a window with a black background and white letters.

Enter the command “diskpart” into it and press the “Enter” button.

Then type the command “list disk”, press “Enter” and a list of all storage devices will appear in front of you. After this, you should find the disk number under which your flash drive is displayed (this can be done based on the size of the flash drive).

After you have found out what number your flash drive is located under, enter the command “select disk” (and the number, for example select disk 2), press “Enter”.

Now type “clean” into the command line and press “Enter”.


After this, you will need to select the first partition; to do this, use the command line again and enter “select partition 1” and press “Enter”.

Type the command “active” and press “Enter”.

Then we begin formatting the partition, to do this you will need to type the command “format fs=NTFS” and, as you already understood, press the “Enter” button.


After entering this command, a flash drive will appear in the system. And after it appears, enter the command “Exit” - press “Enter”.
After completing all the work with the command line, all that remains is to copy the Windows distribution to a flash drive. To do this, it is best to use the 7-zip utility.

We launch the utility and select the ISO image we need. When the image is selected, you will need to click the extract button and specify the path to the flash drive. Once the file is unpacked, Windows will be ready to install.
Installation method number 3
As mentioned above, this is the easiest way. In order to use it, we need the WinToFlash utility, which you can figure out on your own.
After all the above steps, you should have a flash drive with the following contents:

2. Enable file downloading in the BIOS
Now let's talk about how to enable file loading (in our case Window) via a flash drive or memory card in the BIOS.
Turn off your computer, netbook or laptop, insert a USB flash drive into it and turn it on again. While it is loading, press F2, Del or ESC (depending on your system), after which you will enter Bios. If none of the buttons helped you enter the BIOS, then pay attention to the lower left corner of the boot screen and press the button that you see there.
Once you have entered the BIOS, select the BOOT tab and using the F5 and F6 keys you can change the boot order. Again, if the specified buttons did not help change the list of downloads, then the buttons needed for this should be displayed on the screen.

And so, you need to set your flash drive or memory card to the first place in the download list, most often portable USB devices memory is designated as USB-HDD. After this, you should save the selected settings using the “Save and Exit Setup” item.
3. Let's start installing Windows 7 directly
There is nothing complicated here, because installation via a flash drive or memory card is very simple. The main thing during installation is to pay close attention to the operations associated with choosing an installation partition and creating disks.

Reboot the computer (laptop). In the first window that appears, you need to select the system language. Click on the “Next” button.

In the next window, click “Install”.

The next step is to choose Windows version 7. You should choose the one for which you have the key. It is usually indicated on the bottom of the laptop and must be entered at the end of the installation. Click “Next”.

We accept the license agreement and click “Next”.


Now we need to select the partition in which we will install Windows 7. I recommend selecting the system partition. Also, when installing Windows 7 Professional and Windows 7 Ultimate, there will be another additional partition with a capacity of 100 MB. This partition is created by Windows 7 itself and is intended to implement the encryption function system partition, but not for installing Windows.
Click on “Disk Settings”.

Select the “Format” item.

After this, we will see a warning that all data on the disk will be deleted. We confirm.

As soon as formatting is completed, click the “Next” button.

The installation process has begun. We are waiting for Windows to install on the computer.

Once the installation is complete, you must enter your username and computer name.

You can set a password to access your computer, or you can skip this step.

The next step is Windows activation. The code can be entered immediately, or you can wait for 30 days. If you bought a laptop with the system already installed, the activation code should be written on the bottom of the device.


You can set the time and date.

If the Internet is connected to the laptop and the network card drivers are installed, the system will automatically prompt you to specify the network type.
All! Now you know how to install Windows 7 from a flash drive. All that remains is to install drivers and programs.
4. Search and install drivers
Usually you will need to install a minimum of drivers; almost all laptop hardware will work. On the Internet you can find new versions of drivers that will significantly speed up the operation of your laptop. The kit should also include a driver disk and you don't need to search for anything on the Internet at all.
5. Final stage. Installing utilities and programs
Utilities are additional programs that enhance the operation of a laptop. Usually they come on the same disk as the drivers and there is no need to look for them anywhere else. There is no need to neglect their installation; they greatly simplify the work.
You choose the programs to install on your laptop yourself. There will be no special recommendations here, since there are a huge number of them and they solve different goals.
I hope this article will be useful to you and installing Windows 7 from a flash drive is no longer a problem for you.
No disk drive? Installing the Windows 7 operating system using an installation flash drive on a computer or laptop is discussed in detail in this article.
Description of the installation process
The entire process of installing Windows from a flash drive to a laptop can be divided into 4 main operations:
- Recording Windows 7 installation files;
- Setting up the BIOS system;
- Installation of the Windows 7 operating system;
- Installing the necessary drivers.
And now first things first! First of all, you should create an installation flash drive - a kind of image of the Windows 7 installation disk. If you simply transfer all the files from the disk to a USB drive, the laptop will not perceive it as an installation disk! In order to create an installation flash card, you need to perform a couple of simple manipulations on the command line or simply install a utility created specifically for these purposes, of which there are quite a lot on the Internet. Since most utilities have a fairly simple interface, and many of them are in Russian, this article will consider a method for recoding a flash drive using the command line.
So, let's start creating the installation media! To do this, you can use any Flash media with a memory capacity exceeding 4 GB. Before you start transcoding a flash drive, dump all the important information for you onto another storage medium, since during the encoding process all data will be deleted! Before starting conversion, it is advisable to first format the electronic media in file system NTFS in order to avoid possible operational errors.
So, in order to re-encode a flash drive so that the laptop accepts it as an installation disk, you need:


Coming out of command line, you will only need to copy the installation Windows files 7 from a licensed disk or downloaded archive to a flash drive.

Reinstalling Windows
Now let's go directly to reinstalling Windows using an installation flash drive. Since the laptop, by default, starts first the system installed directly on the machine’s hard drive, you will have to change the order in which the operating system is loaded through the BIOS menu, which is required in every laptop and computer. In order to exit to the BIOS menu, you need to display the logo motherboard installed on your laptop, press and hold the F2 key. Each laptop is equipped motherboard The manufacturer's company and the type of BIOS menu are different for each company. Going to the BIOS menu, you need to find the item responsible for the system boot order. In English versions of BISA it is called Boot devise priority and is usually located in the Boot tab.

In the window that opens after selecting the item, you need to find the item First Boot Devise, which is responsible for the system boot order, and change its first value to boot from removable media (USB-DVD), then save the changes and restart the computer. Further
The Windows installation process can hardly be called something complicated. However, there are many myths circulating among PC users about this incredibly difficult process. While installing an operating system from a disk may seem like something traditional, performing exactly the same actions from a flash drive terrifies many. Mainly due to simple ignorance that the USB input can be used as a full replacement for a CD\DVD drive. There can be a huge number of reasons for this:
- Initial lack of a disk drive (netbook, ultrabook).
- Drive failure.
- Disk failure.
- Infection with a virus that prevents the device from reading disks, etc.
Having and installing Windows from a so-called bootable USB flash drive can be a full-fledged replacement for a boot disk.
- Preparing the computer for installing the operating system.
- Preparing a USB drive.
- Changing BIOS settings.
- Installation of the operating system itself.
Each stage has its own nuances and features. Therefore, we strongly recommend that you read the article carefully to the end, or better yet, print it out or download it to your mobile device.
Preparing your computer
Installing Windows may be complete or partial. It depends on what goals you plan to achieve by reinstalling it. Full formats both of your disks (the one on which the OS is located and other additional ones) if you have them, of course. Partial allows you to reinstall only system files. It helps if you accidentally deleted system files or folders (for example, win 32 or *.dll files), but you simply do not have the time or opportunity to transfer all the information from your computer.
If you plan to perform a partial installation of Windows (and you have 2 disks, “C” and “D”), you can move all the important information to a disk that is not a system one. This is quite easy to do.
How to find out which drive the OS is installed on
To understand which of your system drives the operating system is installed on, just open the Start menu and launch “My Computer”. Or go to your computer settings from the shortcut on your desktop. After you start the “computer”, you will see all the hard drives that you have, as well as connected flash drives. Where Windows is installed, a small win icon will be drawn.

If for some reason this method does not work, then there is another way to find out the location of the OS on the computer. For this:

To avoid this need in the future, try to install the operating system on the “C” drive, and also create an additional directory for storing files.
Copying files
Once you have determined which of your drives is the system drive, you can, if necessary, copy all your information to an additional drive (in my case, drive “D”). It is advisable to carry out this procedure in advance before installing Windows. Especially if you have a habit of not organizing your files. Therefore, immediately check the main directories related to the system drive C; by default, this includes:
- Desktop.
- Library (images, documents).
If you are going to perform a partial reinstallation of the OS, then create a new folder on an additional disk and copy all important files there (do not try to copy installed programs, they still won't work!). If the OS installation from a flash drive is complete, then copy your data to other USB drives, external hard drives and cloud services.
The main thing a computer is used for is storing information. Therefore, the most important thing here may be saved passwords, details, and so on. Don’t forget to write down all important logins and passwords (as well as files for WebMoney Keeper) from your browsers, because after reinstallation this information cannot be returned. Of course, if your computer is completely new and you just want to install a different version of Windows, then there will obviously not be important information on it.
Driver preparation
As a rule, some of the drivers are included in the operating system distribution itself and are installed along with Windows. Sometimes it happens that they are installed incorrectly or are completely absent from the installation package itself (it is assumed that the user has a disk with all the necessary drivers).
The main thing that needs to be provided is the presence of a fresh network driver. It is necessary for correct operation Internet network and Wi-Fi adapter. Therefore, it is not necessary to download absolutely all drivers to an additional disk or flash drive. If you have a network driver, you can easily download the rest from the Internet.
Preparing USB media and BIOS
Therefore, this article assumes that you have already created a bootable USB flash drive and are ready to install Windows itself. However, to start this process, it is not enough to simply insert a flash drive into a USB port.
Default BIOS settings are set in such a way that if there is a disk in the disk drive, the computer boots from it. If at the moment Windows boot If there is a flash card in the USB input, this fact is ignored by the system, and loading occurs as usual.
How to enter BIOS
To change the boot priority of devices, just go into the BIOS and set the necessary parameters. For this:
- Insert your bootable USB flash drive into the USB port.
- Restart your computer.
- Immediately after the screen turns on, press the button to enter the BIOS settings (most often this is delete).
If you did everything correctly, you will see the BIOS main menu. It looks something like this:


If you pressed the delete button several times, but the BIOS still did not appear, then perhaps your laptop or computer model uses a different default key to call up this menu. To find out exactly how to enter the BIOS from your computer, use the search or random dialing method (try the F2, F12, Escape, etc. buttons).
Changing BIOS settings
After you manage to get into the BIOS, you need to change the boot order of the devices. Control in this menu is carried out using the “arrows”, the “confirm” key - “enter”, back - backspace or escape. Once you open the BIOS, the control buttons will be marked on the screen.
The next thing you might notice when you get into the BIOS is that it is not Russified. Therefore, to change the boot priority of devices, you will need to know the simplest terms in English that will help you find and correctly change the necessary parameters. So follow these steps:

After you correct the necessary parameters, you can exit the BIOS menu. However, do not forget to save all changes made. Therefore, when exiting, be sure to select Save and Exit.
Installation does not occur
Insert the bootable USB flash drive into the USB port and reboot the device. An inscription should appear on the screen prompting you to press any button to boot the system from a flash drive or disk. If such a boot screen does not appear and the computer starts up as usual, then you may have configured the BIOS incorrectly, or you forgot to save the changes you made. Therefore, open the BIOS again, and then make the necessary changes again. If you are sure that you have configured the BIOS correctly, then the problem may lie in the image itself, the flash drive, or even a faulty USB port. In this case, you may need another USB drive or wine distribution.
Installing Windows 7
After the required loading screen appears, follow the system’s recommendations and press any button to continue the installation.
It should be immediately noted here that depending on the version and build of your operating distribution win systems, the setting of different parameters may be slightly different. There may be additional settings or the absence of those that will be mentioned in the article. In any case, don't worry about it. If you encounter such a situation, just carefully read the information that win offers you to choose and mark the parameters you need. As a rule, for such cases, the Win 7 system explains that in the future all the parameters you select can be changed or offers a choice of “default” settings (if you don’t know what to choose).
The first thing you will be asked to select is the operating system interface language, date and time settings, and keyboard layout. After selecting the settings you need, click the “next” button.

An information screen will appear on which you can familiarize yourself with the reinstallation procedure in detail, after which you can click “install”.
 The Windows 7 installation wizard will prompt you to select one of the operating system versions. It all depends on which image distribution you copied to the flash drive. If you initially downloaded win 7 Home Edition or Professional from the Internet, then this window will not appear. If you have downloaded a collection of various packages, then from the list select the one for which you have license key(it can be found in the laptop box or on the back cover). If you cannot find it or are in doubt, you can enter this information later, within 30 days. Therefore, select the required version and click “next”.
Read the license agreement in detail, accept its terms and continue installation by clicking “next”.

Win 7 will prompt you to select an installation type:
- Partial (updating system files, saving information on an additional drive “D”).
- Complete (all user information will be permanently erased).
Depending on the purpose of installation, select the desired item. If you are in doubt about making a decision, you can read more detailed information in the "decision aid" menu. In principle, further actions will not be much different. The article assumes full installation Win 7, then we will consider the parameters that are equivalent for the selected “full installation” item.

Then you will be asked to select the disk on which the Windows 7 operating system will be installed. Select the desired one with the right mouse button and click on the “disk settings” line.

Select the partition in which Windows 7 will be installed and click “Disk Setup”. If you have never installed an operating system, then this is where you may have difficulties.
Hard drive setup
Usually, in addition to the main disk partitions that are visible to the user (the so-called drives C, D, etc.), there are so-called hidden partitions. This is especially common with new laptop models. Usually the so-called recovery system is located here, which allows you to return the operating system settings to factory settings. There may also be a special section created by win 7. It is necessary for data encryption settings system settings. Therefore, it is better not to change this parameter during OS installation. And if the need arises, then change it using third-party utilities.
In the same “disk setup” menu, format each partition.

This procedure will remove all custom settings. But since you have previously saved all the important information, this procedure is absolutely not scary. The data formatting procedure must be carried out without fail. Therefore, we confirm the removal of all data from the computer.

After the system completes the removal, you can exit the disk settings menu and click “next”. Automatic unpacking will begin.

Configuring operating system settings
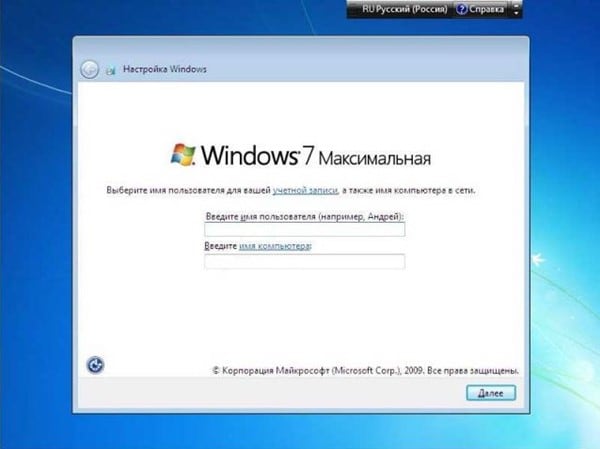
After the system finishes installation, you will be prompted to enter your computer name and username.
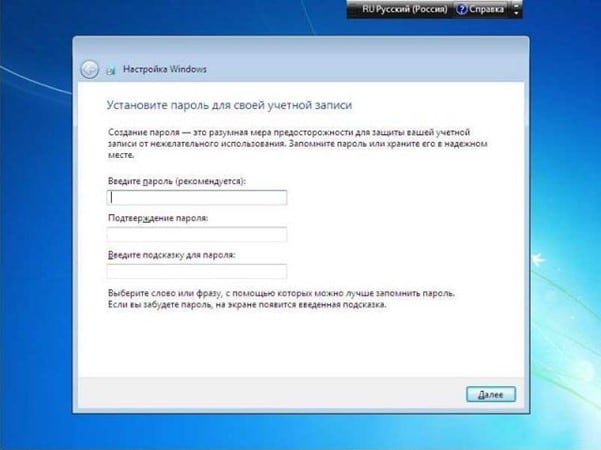
Here you can also configure other administration settings (password, additional accounts).
Then you will be asked to enter the license key (depending on the distribution build, this item may be missing altogether).

Now select windows security settings. Check the top line to automatically check and install updates.

The next item is setting the date and time (time zone). Here you can enable or disable the automatic transition of the system to summer or winter time. Plus, you can always change your time zone settings at any time.

If the win 7 distribution had built-in network drivers, the computer will automatically detect the network connection and prompt you to select security settings. Otherwise, this window simply will not appear.

This instruction on how to install Windows 7 from a flash drive will be interesting and quite viable on any desktop computer and laptop. You just need to download Windows 7, make a bootable USB flash drive and change the boot order in your BIOS by moving the USB to top part. According to the screenshots below, it will not be at all difficult to install Windows 7 from a bootable USB flash drive.
This is a guide about using a USB flash drive, how to install Windows 7 from a flash drive on a computer or laptop. Usage USB flash drives useful if your system unit does not have a CD or when you do not have an installation disk with the operating system.
How to create a bootable USB flash drive for Windows 7
When formatting a flash drive, select system file FAT32 from the dropdown list, then click Start. Remember that Formatting erases everything on it.
Download Windows 7
To download a Windows 7 disk image, go to the Windows 7 download page, scroll down, enter your Windows 7 product key and click Verify, select your language, bitness, and click Confirm. If you don't have a Windows 7 product key, you will need to purchase one before you can download Windows 7.

If you don't want to spend money, then Download Windows 7 SP1, you can from our website using direct links from the official website:
If you are interested in another edition of Windows 7, Home Premium or Ultimate, you can use the Windows ISO Downloader program.
Burning from an ISO image of Windows 7 to a USB flash drive

Setting up your computer's BIOS to boot from a flash drive
Insert the USB flash drive with Windows 7 into the USB port of your computer. Restart your computer. If the computer is turned off, press the power button to turn it on. Quickly press the computer's BIOS enter key.
Your computer's BIOS key will vary depending on the manufacturer, but will usually be one of the function keys (such as F2, Esc, or Del). You can check your computer's BIOS key online or in the manual that came with your computer.
Step by step process: How to install Windows 7 from a USB flash drive?
After rebooting, the computer will boot from the flash drive. This will start the Windows 7 installation process. Select your language, time format and keyboard layout.

Install Windows 7

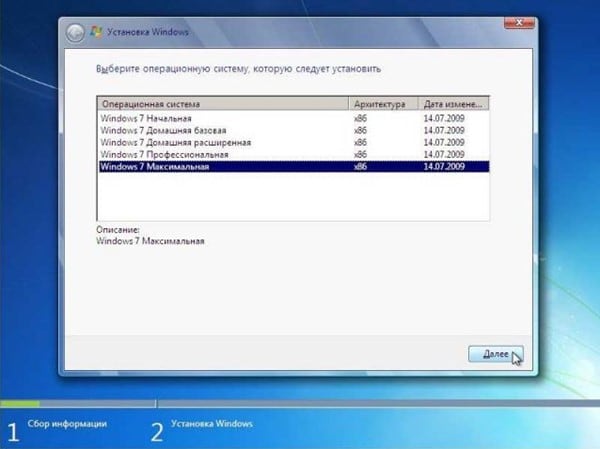
In the window below, select Operating System.

I agree with the terms of use. Select the "I agree" checkbox, and then click Next.

Select Full installation.

Select the partition to install. Select the partition in which you want to install Windows 7, follow the "Disk setup" link.

Format

All files stored on this drive will be lost.

Click "Ok" to start installing Windows 7 from the USB flash drive.

Wait for Windows to complete installation. Your computer may restart several times during this process, and the installation may take anywhere from a few minutes to an hour, depending on the speed of your computer.

Follow the onscreen instructions after installing Windows. You will be asked to create a few more preferences (for example, your language, name account, address Email etc.).

When prompted, enter the product key that came with your computer or installation disc, enter it, and click Next.

Perhaps it will be useful.


