Working with the Microsoft Office software package. Installing Microsoft Office on a Windows PC. Block of tools "Index"
We study the most popular text editor Microsoft Word. In this tutorial, you'll learn how to create a new document, enter, edit, and format text, create lists, apply styles, and more.
With this article, we open a whole series of training materials with which you will learn how to create high-quality text documents in the most popular application in this area - Microsoft Word (Word). The presentation here will be in a rather primitive language, which may at first scare off readers who are already partially familiar with this editor. But, believe me, you will most likely find useful information in this cycle.
Microsoft Word is a text editor (processor) used to create professional-looking documents. The name Word was not chosen by chance, because in translation from English it means "Word".
Due to the fact that Word combines the most modern text formatting tools, with it you can easily create documents of any complexity and organize them. In addition, with powerful editing and editing tools, this application provides a convenient environment for multiple users to collaborate on a single document.
In the first part of the Word tutorial series, you will learn how to create a new document, enter and edit text, and get acquainted with some basic types of its formatting. Here we will begin our acquaintance with the newfangled ribbon interface of the editor. We will also look at creating bulleted and unlabeled lists, changing document margins, and much more.
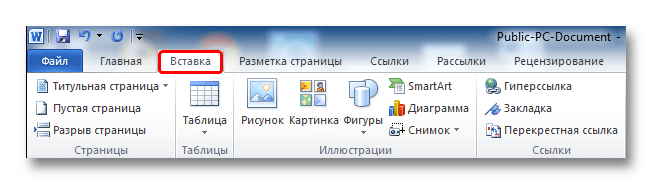
PROGRAM WINDOW
When you open Word in the program window, its two main parts are displayed: the ribbon located on top (highlighted in red in the figure below) and an empty document that occupies almost the entire program window.
The ribbon includes a set of buttons and commands that perform various actions on a document and its contents (for example, resizing text or printing it). The document window itself looks like an ordinary white sheet of paper and is designed to enter all kinds of test information.
Also above the ribbon on the left is the quick launch menu, in the middle is the name of the document, and in the upper right corner are the buttons for minimizing, resizing and closing the program window.
In the opened document in the upper left corner of the page you will see the cursor, that is, a small blinking vertical bar. This feature indicates that, starting from this place, the characters you entered will appear.
ENTERING AND EDITING TEXT
After opening the program, just start typing, and the letters, words, and sentences you enter will start showing up on the document page. In order to start typing on the same page, but one line below, you must press the Enter key. The number of hits on Enter will correspond to the number of skipped lines. As you enter text, the cursor gradually moves to the right. When you reach the end of the line, just keep typing letters. The characters and the insertion point will automatically wrap to the next line.
If you need to start a new paragraph, press the Enter key to do so. As a result, the cursor will automatically appear at the beginning of a new line. If you want to make the spacing between paragraphs a little more, press the Enter key again before you start typing a new paragraph.
If you need to correct a mistake in the typed text, just place the cursor to the right of the unnecessary letter and press the Backspace key. The cursor will delete the character to the left of it. If you want to erase the entire word, press the indicated key as many times as the word disappears. There is another option for deleting an error: put the cursor at the beginning of the word, that is, to the left of it and press the Del key as many times as necessary.
Practice your typing and editing skills by typing a few arbitrary paragraphs, or by typing our suggestion.
.jpg)
ERROR CORRECTION
As you type, Word warns you of grammatical or spelling errors by highlighting them with a wavy green or red line. A green underline indicates that the grammar needs to be checked, and a red underline indicates possible spelling errors or that the word (for example, a proper name or place names) is not recognized, that is, it is not in the dictionary of the Word editor.
What to do with such highlights? To do this, move the mouse cursor over the underlined word and press its right button. As a result, a small window will appear with suggested fixes. Select the required word and click on it with the left mouse button. The word will be replaced and the underscore removed. If the word is not recognized, Word will not offer any suggestions. Note that if such underlining is not corrected, it will not appear on the printed pages of the document.
Similar actions can be done with green underlines. But keep in mind that Word is good at recognizing spelling errors, most of which are quite easy to fix, and finding grammatical and word usage errors on your own is much more difficult. If you think you're right and Word suggests the wrong options, just skip the correction by selecting the appropriate item from the right-click menu and the underline will be removed.
If you don't feel comfortable focusing on every underscore, you can ignore them as you type, and check spelling and grammar for the entire document when you're done typing. To do this, open the tab Peer review at the top of the ribbon and select Spelling in Group Spelling.
If you still have questions about working with the ribbon, come back to this point later, as the description of working with it will go a little lower.
SELECTING TEXT FRAGMENTS
In order to perform any actions with the text in the document, it must be selected, and then the desired command must be applied to the selected area. To select a whole word or a preposition, it is enough to double-click on it, after which the selected area will be highlighted in blue.
There are two ways to select an arbitrary piece of text. In the first case, place the blinking cursor at the beginning of the fragment you want to highlight. Then press the Shift key and, without releasing it, click at the end of the desired fragment. After that, the required text will be highlighted with a blue background to show that it is selected. Click anywhere in the document to deselect.
In the second case, also place the blinking cursor at the beginning of the fragment, but this time hold down the left mouse button and move its pointer to the end of the desired fragment. After achieving the desired result, the button must be released.
If you need to select several fragments in different parts of the text, use the Ctrl key. Select the first section of text in any way, then press Ctrl and, without releasing it, select the next section, after which the key can be released. If you need to select another fragment, press the Ctrl key again and continue.
TEXT FORMATTING
To draw attention to important information, for example, you can make text bold, italic, or underlined. But these are trifles. You can change its size, style, color, background and apply animation elements to it. And even this is not the whole list of opportunities that Word provides to users when working with text.
Now it's time to remember the ribbon (ribbon interface), which was discussed at the very beginning of the article, and find out how you can use it.
At the top of the working window there are several tabs. Each of them contains a specific set of actions. We need to select the second tab - home(If it is not selected, you must click on it with the left mouse button).
Each tab contains several groups with commands that combine several elements. On the tab home find a group Font(the names of the groups are in the bottom line of the tape). This group contains several commands and buttons that allow you to make various changes to the text.
In our case, select an arbitrary section of text or a whole word, and then click on the corresponding buttons in the above group to change its style.
.png)
As can be seen from the figure, after pressing the button Bold, the selected text has changed its style. And now let's make it even more slanted and underlined by clicking on the buttons Italics And underlined.
In this case, the underline can be either regular solid or wavy, dotted, double, etc. Use the triangle button on the right to see the full list of options.
.png)
From our example, you can see that you can apply several types of formatting to a single selection.
As you may have noticed, the group Font contains quite a lot of different useful buttons that make it possible to change the type and color of the font, its size, cross out the font or convert it to superscripts and subscripts, add animation or background. Select a piece of text and try to apply all these formatting options to it yourself by clicking on the appropriate buttons.
STYLES
The method of making changes discussed in the previous section is convenient only if you need to change the format of just a few characters, words, or sentences. To apply several types of formatting to the entire document at once, styles.
Different kinds of styles are available on the tab home in Group Styles. It is enough to select any style to automatically change the font, text size, attributes and paragraph formatting. For example, you can change the font style, make the text larger, and add bold formatting at the same time.
.png)
As you can see from the figure, after choosing a style called Heading 1, our first paragraph has been converted into a heading (the font size has increased, its color and thickness have changed).
To experiment, on the tab home in Group Styles Hover your mouse over the different styles one by one. Thus, you can see the changes that will happen to the document after you want to apply any option. To finally apply the selected style, just click on it with the left mouse button. To view other styles, you can open the collection by clicking the button in the lower right corner of the block with an arrow Other.
CREATING LISTS
If you need to create a list in a document, this can also be done on the tab home in Group Paragraph(which is located to the right of the group Font).
Let's practice. First of all, separate the text that will be converted into a list into different paragraphs using the Enter key. At the same time, it can be both individual words and whole sentences.
In our example, we decided to list the last paragraph.
.png)
Now select the text you want to convert to a list. In the Paragraph group, click the button Markers. The text will be converted to a bulleted list. Without deselecting the list, press the button Numbering to create a numbered list.
.png)
.png)
PAGE FIELDS
The margins of a page are the empty space around the edges of the page. The default margins for the top, bottom, left, and right of the page are 2 cm, 2 cm, 3 cm, and 1.5 cm, respectively. This is the most common margin width and is often used for most documents. But if you need fields of a different size, you need to know how to change them. Margins of other sizes may be useful, for example, when writing short letters, recipes, invitations, or poems.
The ribbon is also used to resize fields. Only this time use tab Page layout. You must first click it to select it, and then in the group Page settings select item fields. You will see images (icons) of the fields and their sizes.
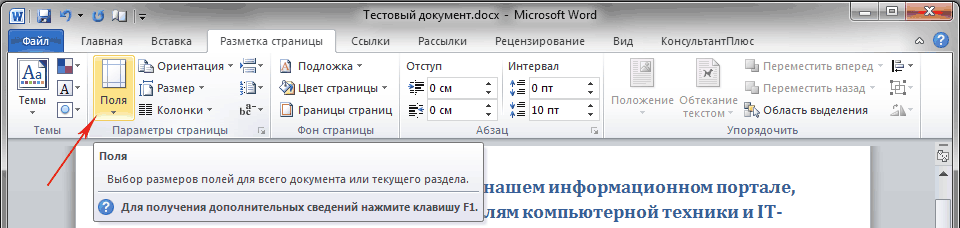
The first value of the list is a field Normal which is currently active. To create narrower margins, you must click the button narrow. If you want to make the left and right margins much wider, click wide. When you select a field type, they will automatically be applied to the entire document.
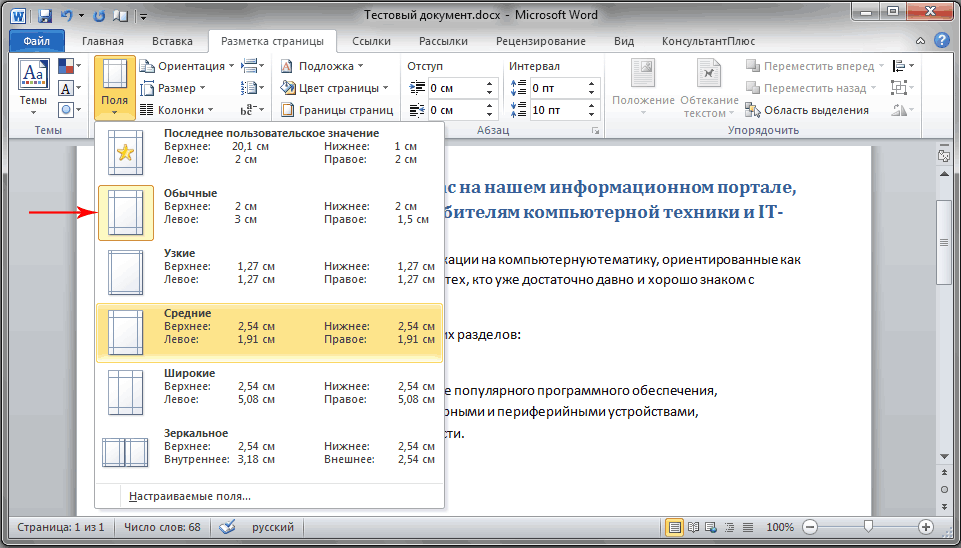
When fields are selected, the background color of their icons will change. By pressing the button again fields, thanks to this change in background color, you can determine what size margins are set.
WINDOWBACKSTAGE
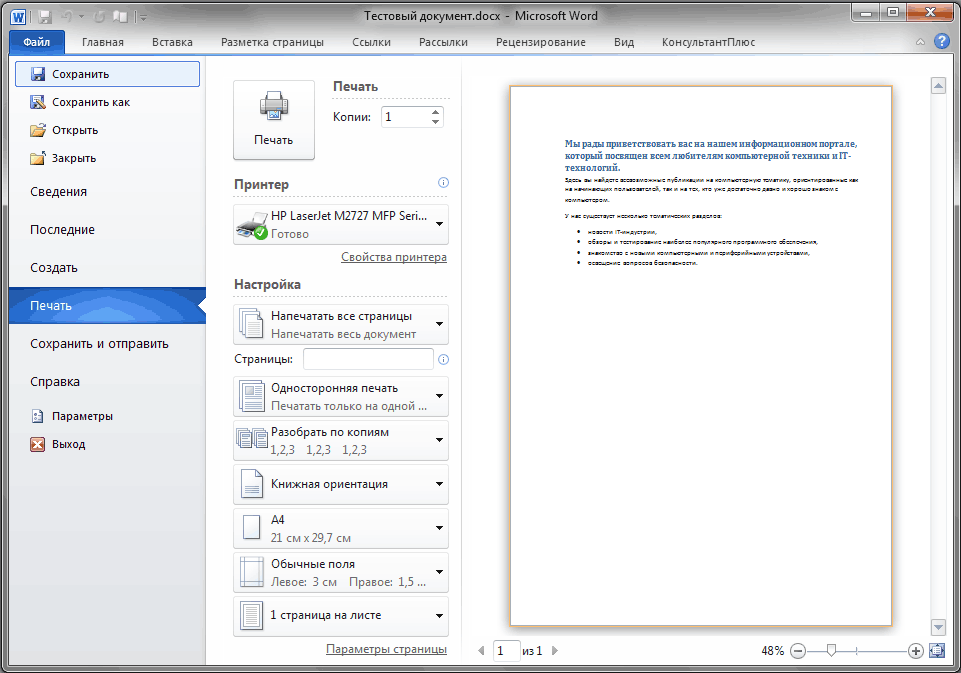
In order not to lose the changes made in the work, they need to be saved, and the sooner this is done, the better. To do this, open the very first tab on the ribbon. File. A large window will appear called Backstage, in which you can perform various operations, for example, save, open, print documents, and so on.
In the left pane of the window that appears, select Save. A new smaller window will appear. In this window, you need to specify where on the computer you want to save the document, as well as what name it will have. After you save a document, keep working by saving it periodically. It is also very convenient to save a document at any time by pressing the Ctrl + S key combination.
If the document is already ready to be printed, open the tab again File. In the left pane of the menu that opens, select the command Seal. A large window will appear in which you need to click on the line Seal. Of course, at the same time, a printing device must be connected to the computer - a printer or an MFP. As in many other cases, you can print a document using hot keys - in this case, this is the key combination Ctrl + P.
After the work on the text document is completed and the document is saved, close the file. To do this, open the tab File and in the left area click close.
To find a document after you have closed it, browse the list Latest Documents. Click a document in the list and it will open.
To complete work in Word in the tab File choose a team Exit at the very bottom of the menu or simply click on the cross in the upper right corner of the program window.
CONCLUSION
On this, let me finish the first part of the training materials on the most popular text editor Microsoft Word.
To consolidate the acquired skills, be sure to practice your knowledge by typing a few short texts yourself and applying various formatting elements to them.
In the next part, we'll learn how to cut and paste chunks of text, change line spacing, justify, use formatting marks, and more.
Read also:
Microsoft Word is a text editor that can be part of the Microsoft Office suite or a separate program installed on your computer. The program can be used to write letters and various types of documents, which may include graphics and images. This guide explains how to open Microsoft Word, launch, create and save a new document using the Windows 7 operating system.
Do not be afraid that something may not work out or go wrong. This program was created for users, and it is thought out to the smallest detail so that you can use it as conveniently as possible. And of course, in every business, the main thing is training, do not be afraid to make mistakes. If you accidentally clicked in the wrong place, there is always a curved arrow in the upper left corner that allows you to undo the last action. You can also do this using the keyboard shortcut Ctrl and Z.
The last piece of advice before starting the detailed instructions for using the Windows text editor is . This is especially important when working with voluminous texts or serious documentation. Anything can happen: they can turn off the electricity, the laptop can be discharged and turn off, and no one is safe from breakdowns. Losing important files and then spending hours recovering them is not the most pleasant thing to do. All you need is to click on the floppy disk in the upper left corner from time to time.
The program can be found in the Start menu under "Microsoft Office". Follow these step-by-step instructions to launch a document in Microsoft Word.

Program navigation

How to select (highlight) text
Selecting or highlighting text allows you to change the selection in terms of style, font and/or color, and even replace words if needed. Follow these step-by-step instructions to select text in a document.
Step 1. The mouse is used to select text. As you move, the pointer will change.
Step 2. Move the pointer to the beginning of the required fragment. Click and hold the left mouse button. As you do this, move the pointer to where you want to stop the selection. As you move the mouse, the text will be highlighted. When you have finished your selection, release the left mouse button.

The selected text can now be formatted or modified.
You can copy text using the Ctrl+C keys. Delete text - Backspace.

Changing the size and font
The following actions can help make your text more interesting and attractive. The text can be changed in different ways.


Text alignment
Sometimes the created document may require a different arrangement of paragraphs. By default, text is left-aligned. However, text can be aligned both right-aligned and centered.

On a note! Select all text Ctrl + A.

You can change the selected text using a combination of keyboard shortcuts, which is sometimes easier:
- Center - select the text, press Ctrl + E.
- Right - Ctrl + R.
- Fit Width - Ctrl + J.
- Align left - Ctrl + L.

How to make text bold, italic, or underlined
The ability to change the font style can make your document more interesting. Different text styles, such as bold or italic, can make it stand out. Underlining can be useful for headings.

- bold - Ctrl + B;
- italics - Ctrl + I;
- underline - Ctrl + U.
Copy and paste
There is no need to talk about the importance of these two functions. They significantly save our time, allow us to insert without retyping it, as it was in the days of typewriters.

You can also do this using hotkeys. Everything is the same as last time: press Ctrl and C at the same time to copy the text, and Ctrl and V to paste.
How to create a numbered or bulleted list
Using numbered or bulleted lists can help highlight items or show important steps, hierarchy, or sequence of something.

To stop adding new elements and return to standard text, click the numbering icon again at the top of the document.
The bulleted list is created in the same way, the only difference is 1 step. Instead of the "Numbering" button, click on the "Markers" button, it is located to the right.
There is another way to create a list. First, the user enters all the items in the list, each necessarily on a new line. When all the items are typed, select them all and click either on the numbering or on the markers, depending on which list you need.

You will get the same result. These are different ways and there is no right or wrong, the main thing is that the goal is achieved. Use the method that is convenient for you.

They help to structure information, present it in a more presentable form. This skill is indispensable.
- Step 1. On the top toolbar, go to the "Insert" tab.
- Step 2 Click on the table icon. A window will open in front of you in which you need to select the number of cells. You can do this by entering the numbers manually. To do this, on the panel that appears, click on the "Draw Table" area.

You just have to fill in the fields. If you suddenly need additional rows or columns, you do not have to redo it entirely. Left click in the table area. In the menu that appears, click "Insert" and select the appropriate option.

This basic knowledge should form your basic principles of working with text. Let's highlight the main ones:
- The text is entered where the blinking cursor is and nowhere else.
- To change a character, word, line, paragraph, or entire text, it must first be selected. It is necessary that the computer understands what exactly it should perform actions on.
- Once you select the text, you can do whatever you want with it. You can practice, select a fragment and alternately click on the buttons that are located on the "Home" tab. You will notice which features can be used together and which are mutually exclusive.
- Don't forget to save your changes so you're safe.
- Use those methods of solving the problem you are facing that are convenient for you.
Video - Word for Beginners
Probably everyone knows that Microsoft launched the Office service online, if not, then office online these are web applications - Word, Excel, PowerPoint, OneNote and novelty Sway. To work with the package, you do not need to install, just select any application and use it completely free. Is it really convenient?
The software package for editing documents "Office Online" allows you not only to view, but also create, edit previously created documents, and most importantly, you do not need to purchase an expensive license for MS Office products.
In this guide, we will not only look at how to use MS Office online, but also try to integrate MS Office online into Windows 10 as much as possible, after which we will be able to create new Word, Excel, PowerPoint, OneNote, Sway documents and edit them almost like with a desktop program Microsoft Office, only free.
Note: The instruction is written for Windows 10, which uses a microsoft account to log in.
First of all, let's solve the issue of launching / creating MS Office documents directly from the desktop. To do this, we need to create shortcuts for the programs of the office suite, after which we can pin them to the taskbar or the Start menu.
We create shortcuts for Word, Excel, PowerPoint web applications.
Creating shortcuts for the online MS Office package is easy.
- On an empty spot on the desktop, right-click, in the context menu that opens, select "Create" → "Shortcut".

- In the line, copy and paste or type the link below, according to the required application from the MS Office package, click the button "Further", in the example we create a shortcut for the Word text editor .

- In the next window, enter the desired name for the shortcut.

- word: https://office.live.com/start/Word.aspx?ui=ru%2DRU&rs=RU
- Excel: https://office.live.com/start/Excel.aspx?ui=ru%2DRU&rs=RU
- PowerPoint: https://office.live.com/start/PowerPoint.aspx?ui=ru%2DRU&rs=RU
- onenote: https://www.onenote.com/notebooks?ui=en-RU&rs=RU&auth=1
- Sway: https://sway.com/my
Repeat this operation for the applications you need.
Set up OneDrive cloud storage.
With File Explorer, you can create any folder in OneDrive to store your documents. In the example, we will use the Windows 10 folder - "Documentation".
In order for a new MS Office document to be saved to the Documents folder or to be able to edit previously created documents from the folder, we need to configure OneDrive.
Let's open the OneDrive settings, we are interested in the "Autosave" tab.
- Right-click the OneDrive icon on the taskbar and select from the menu that appears "Options".

- In the window that opens, go to the tab "Autosave".

Here it is necessary in paragraph "Documentation" select from dropdown list One Drive, making changes, press the button "OK".
If everything is done correctly, then in the OneDrive folder you will see that the Documents folder has appeared.

Let's test how we managed to integrate Microsoft Office online into Windows 10.
Creation and editing of documents.
Let's create a new document in MS Office online from the desktop.
- To do this, run any of the previously created Word, Excel, PowerPoint shortcuts. On first launch, you will be prompted to sign in with a Microsoft account, if you are already using an account to sign in, you won't need to enter a password.

- In the window that opens, click " New document" or you can choose one of the available templates, everything can start printing, agree quickly and conveniently.

The document is saved automatically. You don't have to worry that the typed text in Word or the Excel spreadsheet will not be saved.
- After you have made changes to the created document, close the window and in Windows Explorer navigate to the folder " One Drive" → « Documentation".

In the folder you will find the document you created, it is stored not only in the cloud but also on your computer, that is, you will have access to the created file even without the Internet.

Note: you must understand - if you delete a file on your computer, it will be deleted in the cloud and vice versa.
How to open or edit previously saved documents in MS Office online.
You can transfer your old documents created in any version of MS Office to this folder and easily open and edit them.
To open a previously created document, open File Explorer, navigate to the " OneDrive" → "Documents", right-click on the desired document and select from the context menu "View online".


After opening the document, you can make edits (See screen shot of Word Online as an example).

That's all, now you can create and edit your documents, and most importantly, you do not need to purchase an expensive license for MS Office products.
Hope the information is helpful. What do you think about Microsoft Office online, share in the comments below.
Microsoft Office Word is a software tool for writing and processing text. This program is very common in everyday office work. Often, employees who have to work with text require minimal Office skills. There is nothing difficult in printing a text, but certain knowledge is needed to process it and correctly format it.
Basics of working in Microsoft Word
With the help of Word, you can create texts of various types: abstracts, term papers, documents, and so on. It is possible to design text by changing the appearance, adding pictures, tables and other necessary elements.
Typing text into a document
By opening the program from the desktop or menu "Start", we will be greeted by a blank white sheet of A4 paper. The sheet format can be changed to any other standard, more on that later.

You can scroll through the pages using a special slider to the right of the A4 sheet, or with the wheel of a computer mouse.
To start typing text, using the left mouse button, position the cursor at the beginning of the intended text at the top of the page.
If you accidentally did something wrong or deleted a piece of text, you can return the action back. To do this, use the keyboard shortcut "Ctrl + Z".
Saving the finished document
To save your work, written on a blank sheet of electronic "paper", into a full-fledged file for further use or processing, there are several options:


Microsoft Word sets the option to automatically save the document by default. You can disable this option along the way: "File" — "Options" — "Preservation". In this menu, you can select both the ability to disable autosave and the time interval after which this function will save the modified file automatically. A very useful feature for people who forget to save their documents manually.

When working with documents that are important to you, do not turn off the automatic save function to avoid data loss. The reason for the crash of the program can be anything: accidental closing of the program, crash of the computer due to weather conditions, and so on.
Working with font
The visual perception of the text is very important for the reader. Sometimes, due to incorrect design, the person reading the text loses all desire to finish reading it, no matter how interesting it would be. For a presentable appearance of the typed stream of letters and symbols, there are tools built into the program.
The more complex the design of the text looks, the less willing it will be for the users of the document to read. It is customary to use the font when choosing the appearance of the text Times New Roman 14th size. For headings, size 16 is used.
If you still decide to use a different font at your discretion, Word offers its users a ready-made list of fonts preinstalled with the operating system. In the event that the amount provided is not enough for you, you can install additional fonts downloaded or purchased on the Internet.
The font has two main parameters, it is the font type and its size. In addition to them, there are also other, additional options for more original text design. To apply any of the options, you first need to select a specific fragment of the document for its processing. To do this, hold the left mouse button on the beginning of the fragment and drag to its end. To select all the document at once, press the key combination "Ctrl+A".

- To change the type, just click on its name on the panel and select a new font from the list. By hovering over the desired option, you can preview what the text will look like before making your final selection. You can scroll through the list using the mouse wheel or by pressing the slider that appeared on the right in the open window.

- To change the font size, click on the numeric value to the right of the font name and in the same way you can adjust the size of letters and symbols.

Additionally, you can change the font size without selecting a numeric parameter, but only by clicking on the two buttons responsible for this. The left button increases the size of the letters by one step, and the right one, respectively, reduces it.


Document content alignment
There are four functions for aligning content in a document with a sheet:
- Align left (keyboard shortcut "Ctrl+L");
- Center alignment (keyboard shortcut "Ctrl+E");
- Right Align (Keyboard Shortcut "Ctrl + R");
- Justify (keyboard shortcut "Ctrl+E").
If everything is clear with the first three functions, then what is the essence of justification in width? Everything is extremely simple. This parameter is required when accepting documents in some organizations, because after its application, the text regularly fills the sheet on both sides. To understand this, let's see how it works with an example:
- Left alignment:

- Justify:

The example shows that in the second version, the text on the right side is placed more neatly, closer to the edge. This is how the format of official material should be when it comes to alignment.
Change the style of the text
Almost any editor has the ability to change the text style, and this feature, of course, did not bypass the legendary Word. There are also keyboard shortcuts for these options to quickly design materials.
The Word editor provides three main functions for changing the style. Access to them is open in the top control panel, in the same window as the font selection.

- Bold (key combination Ctrl+B);

- Italic (shortcut "Ctrl+I");

- Underline (key combination "Ctrl+U").

These parameters can be combined with each other. This is what the text will look like with the three style options mentioned above applied to it:

Inserting an image into a Word document
- To insert an element into a document, you must first open the submenu "Insert" in the top bar of the program.

- In the gallery of the Word program, there is already a certain set of images for inserting them into the document. To view these files, click the button "Picture".


In the window that appears, look for the desired image among the files on your computer.

As you can see, it is not difficult to perform the main work in the Word office program, the main thing is to get used to the interface and adapt to the functions to understand their purpose.