Xp on a new computer. Methods for traditional and automatic installation of Windows XP from disk. Typical errors when installing the system
Friends, with this article we are opening a new section dedicated to how to work with a computer correctly. We will cover such issues as installing Windows XP correctly, as well as updating drivers and other programs for everyday use.
Many will say: “ What should I put there? Is everything simple there?" Do you know that incorrect installation of the OS in most cases is the main cause of malfunctions when working on a computer, ranging from banal freezing and braking to errors at the hardware level.
Depending on how you place it operating system on your computer will depend on how well it serves you. So, let's figure out how to install Windows XP correctly.
We analyzed enough material on the Internet on this topic, but we did not find a simple and adequate discussion of the topic. Also, to simplify perception and better understand the OS installation process, a video story with a detailed description was prepared.
No attention was paid to such trifles as “buying a disk with an operating system” or “whether you need to read the license agreement.” We paid special attention to the initial setup of the installed system.
Basic steps to install Windows XP
- 1. The first thing you need to do is change the boot order in the BIOS to “boot from optical disk”. To do this, when loading the OS, you need to click “ F2”, or “ DEL”, and go to the “ tab BOOT", where by pressing the " key + " or " — ”, edit the boot order so that the entry “ CD-Rom Drive” was at the very top.

- 2. Save the settings by pressing the “ key F10" When you restart your computer, the message “ Press any key to boot from CD..”, you must press any key to start booting from the installation disk.
- 3. Next, preparations for installing the operating system will begin. When the welcome window appears, the system will once again ask you to confirm your intention to install a new OS, press the “Enter” key.
- 4. When the license agreement appears, click “ F8” to accept it and continue with the installation.
- 5. If you reinstall the OS, the installer will try to restore installed version. We don’t need this, press “Esc”.
- 6. Next, perhaps, the most important thing. Selecting a partition for installation. If you already have a priori HDD divided into logical partitions: system and one or more user ones, then this is very good. Then you just need to delete system partition, then create it, format it and install a new OS on it.

If your hard drive has not been divided before, then this needs to be done right now. For what? Everything is very simple. By dividing the hard drive into a system part and a user part, you create a safety net for yourself. if the OS fails in the worst case, you will simply reinstall the OS on the formatted system partition, but your user data will remain safe on the user partition.
How to properly divide a hard drive, watch the video. As an example, the video lesson looked at a 10 GB hard drive. If your hard drive allows it, make the system partition at least 20 GB.
- 7. Next, you need to format the partition with the NTFS file system type. Select Quick Format.
- 8. The system will reboot, take advantage of the opportunity and restore booting from hard drive, not from CD-Rom. We have already looked at how to do this in the very first steps.
- 9. After rebooting, the system will continue with the installation. The first window that appears will be “ Regional settings window”, where you need to select the keyboard layout.
- 10. Next, the installer will ask you to enter the Name and organization name. Enter only the Name and click next.
- 11. In the window that appears, enter the product license key. Be careful.
- 12. Set the Computer name. Leave the administrator password field blank for now.

Make the necessary date and time settings. One thing is true: at the moment, we have legally abolished the transition to winter time. I advise you to install the appropriate update from the official Microsoft website (WindowsXP-KB2570791-x86-RUS). This can be done after installing the OS.
- 13. Next, you need to determine whether the computer will work on a domain network or not. We don’t change anything, click “ Further" We wait until the installation program finishes its work and reboots.

- 14. When you first start, the system will try to automatically adjust the screen extension. accept them if you are satisfied with the selected option. When the welcome window appears, click “ Further”, we put off the automatic update settings, we skip the Internet settings, we put off registering with Microsoft.
- 15. Create an account.
- 16. Initial OS setup is mandatory. Watch the video and follow everything step by step. After completing all the settings, you will receive an optimally configured computer ready for work.
Video “how to install Windows XP correctly”
We watch the video and learn. If something is not clear, ask questions.
Hello, dear reader! Today I would like to look at a “fundamental” area of computer knowledge, namely, to explain how to install Windows XP on a computer from a disk.
In everyday life, it is generally accepted that anyone who knows how to do this already definitely knows at least a little about computers. I cannot judge how true this statement is, but I have no doubt that this material can be useful to many.
Attention! If you need an original installation disk from Windows XP or any other version, then write to me by email [email protected]. Thus, you will receive an image without viruses and 100% bug-free.
Today we will learn how to reinstall the Windows XP operating system, or as they more often say “reinstall Windows”. Let me note right away that using this article, you can not only reinstall the OS, but also install it on a new hard drive or clean partition.
At the end of the article you can watch a video tutorial.
The quality of the installed system largely depends on the distribution you will use. I do not recommend using various assemblies like Zver DVD and similar ones.
The right choice would be a distribution that has had minimal changes. Ideally, it is better to use the official version. Depending on which distribution you choose, you may be missing some of the following items during the installation process. This does not affect the performance of the system in any way; their number is reduced specifically in order to simplify and speed up the installation process.
You can make an installation disk yourself, use pre-installed drivers (integrated), and also configure all settings so that they are not specified when installing Windows. I will definitely tell you how this is done in one of my next articles.
After installing this Windows versions, you can install any! If you don’t believe me, you can read an article about installing other versions of Windows on the blog:
Steps before installing Windows XP
Before I start telling you how to install Windows XP on your computer from a disk, first you need to make sure that you have there is a license key suitable for the existing disk. It can usually be found on the surface of the disc, on the box, on system unit(if you bought a computer with Windows installed) or in text file called "serial.txt" or "s/n" on the disk itself.
In the latter case, the disk must be started before reinstalling the OS and the key must be copied onto a piece of paper. Another option is possible - the license key may be located where you downloaded the disk image.
Before you begin the installation, copy all data from the system drive “C:/” to another partition, for example, “D:/”, a portable hard drive, or a flash drive.
Preparation
Before starting the installation, you need to force the computer, after turning it on, to access not the hard drive, but the optical drive (into which you have already inserted the Windows XP installation disc).
This can be done in two ways: the first is to force the computer to access the optical disc drive once during installation, the second is to make the computer always check for the presence of a disk in the drive.
To implement the first method, you need to go to the boot menu " Boot menu" and select " " from it. To do this, after turning on the computer, PRESS the “F8” or “F12” button. You must not just press and hold the button, but repeat the presses.
To implement the second method, you need to go to the “BIOS” setting - “BIOS Setup”. To do this, when booting the computer, press the “F2”, “F10” or “Del” key.

In the BIOS you need to find a setting indicating the boot order of devices; it will be called something like this: “Boot device priority”.
This can be presented in the form of several items: the first boot device is “First boot device”, the second is “Second boot device”, the third is “Third boot device”, etc.

In order to find out which button you need to press to load the BIOS, you need to look carefully at the screen - there will be hints at the bottom. The button for the first method will be labeled “Boot menu”, and for the second “Setup”, “BIOS” or “BIOS Setup”.

The first method is more suitable for beginners, as it will not lead to anything bad. Unlike the second one, where the user can make a mistake when setting up the BIOS. In addition, after successful installation of the OS, the settings made in the second method must be returned to their original position, which is not required in the first method.
Launching and installing Windows XP
Once the steps described above have been completed, and after turning on the power, the computer boots from the disk and the installation disk is inserted into the drive, you can continue with the installation.
In principle, I have already talked about the nuances of how to install Windows XP on a computer from a disk. But in order for the article to be complete, so to speak, we will complete the Windows installation.
After you restart or turn on your computer, you will be asked to click " Press any key to boot from CD…", which means "Press any key to boot from disk." Accordingly, when we see the message, press any button. I usually press Spacebar (it's hard to miss).

If everything is done correctly, you will soon see the screen shown in the following figure, which indicates that the installation program has begun its preparation procedures.

If the installation is performed on a hard drive that already contains an installed version of Windows XP, you will be prompted to restore it using the Recovery Console. Since we have firmly decided to reinstall the system, press “Enter”.
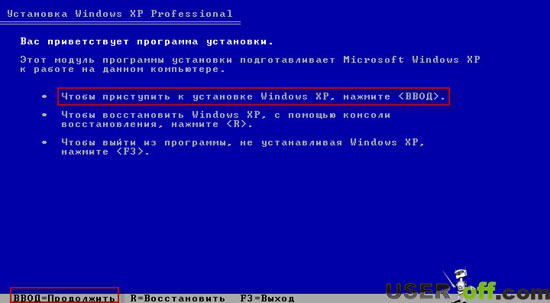
The next step is to demonstrate the Windows XP License Agreement. Of course, we agree with him, so we press “F8”.

If your computer already has Windows installed, you will be prompted to restore the system, indicating where it should be installed. We refuse, press “Esc”.
 The next step is to select a location to install the new system. Here the installer will show a list of your hard drives and the partitions on them.

If you are reinstalling the OS, then you need to select the partition with the letter “C:” (it is assumed that this is where the old OS is installed) and press “Enter”.
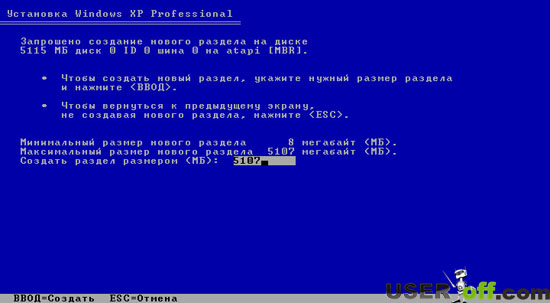
If the installation takes place on a blank hard drive, then instead of a list of partitions it will be written “(some) MB”. In this case, you first need to create a partition for the system; to do this, press the “C” key.

On the screen that appears, you need to specify the size of the partition to be created in megabytes. By modern standards, for comfortable work, the system partition should be made 30-50 GB in size, that is, you need to specify a figure from 30,000 to 50,000 at your discretion. If you play modern games on your computer, then you need to create a partition from 50,000 to 100,000 MB.
Upon returning to the previous screen, the created partition will be assigned the letter “C:”. Select it and continue by pressing “Enter”.
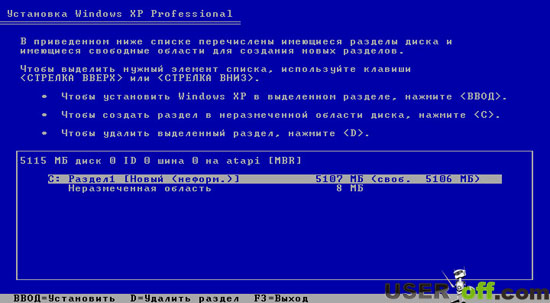
If you are reinstalling, that is, you are installing the system on a partition with the OS installed, then the program, suspecting that you intend to install two copies of Windows on one partition, will warn you that this is not recommended. Press "C" to continue.

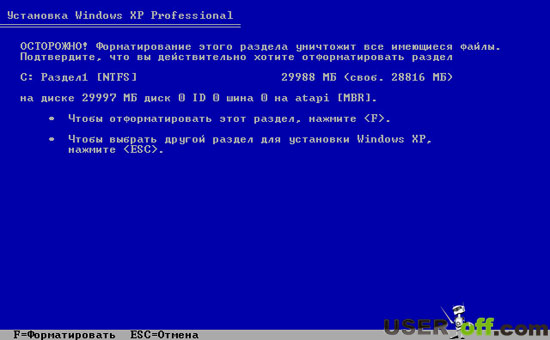
After this, we will be warned that during the formatting process all data on the selected partition will be lost. But we were ready for this, and before reinstalling, we copied all the valuable data from the “C:” drive (after all, we copied it, right?). Select “Format partition using NTFS (Quick)” and press “Enter”.

When asked by the system, press the “F” button.
Ahead of us are two screens that do not require user intervention. The first of them is the progress of the formatting procedure, the second is the process of copying files to the hard drive.

Copying data.

After completing these steps, the computer will restart. He will wait 15 seconds, you can hurry him up by pressing the “Enter” button.

Important point! After the reboot, you no longer need to boot from the disk; the further installation procedure will continue using the files copied to the hard drive. That is, you ignore the sentence “Press any key to boot from CD...” (if it appears). You just don't press anything. The disc remains in the drive.
Further appearance has a more pleasant and familiar GUI. Dialog boxes will appear from time to time. I will note right away that the time until the installation is completed, indicated at the bottom left, is very different from the truth and depends most of all on the performance of the computer; the speed of the hard drive is also important.

The first dialog box will be "Region and Language". There is no need to change anything in it, but if you want, you can click the first and second “Customize...” buttons and select the desired parameters at your discretion.
Select the country you are in and click “Next”.

In the next window you will be asked to introduce yourself. Feel free to write your name or nickname here.

Next step - input license key. It needs to be prepared in advance, as mentioned above.

A friendly name is required if the computer is running in local network(even at home from 2-3 PCs). Otherwise, you don’t have to bother. It is recommended that you set the administrator password and write it down in a safe place for security reasons. However, if you have any doubts due to forgetfulness, you can leave the field blank.

Select the current date, time and time zone.

In the next window, leave the default settings and click “Next”.


When the computer starts to restart, you can remove the disc from the drive since Windows XP is already installed on the computer.
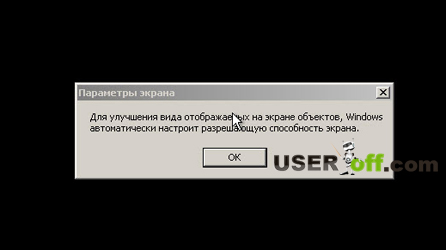
In the “Display Options” message, click “OK”.
The following message is a screen health check, if you see this message, click “OK”.

After this, the “Welcome” screen will appear, click “Next”.


When checking your Internet connection, click the “Skip” button.

Select “No, some other time”, click “Next”.

Afterwards you will be asked to specify the users who will work on this computer. A separate account will be created for each. If you will be the only one working, enter your name and click Next.

On the last screen you will be informed that the installation is complete and will say “Thank you”, all you have to do is click the “Finish” button.

If all the steps described in the article were performed correctly and the process was successful, congratulations, now you know how to install Windows XP on a computer from a disk.
The next step is to install drivers for your devices. To find out how this is done, read the article: “”. And about the software that will be useful after reinstalling the OS, you can read in the article: “”.
See you soon!
P.S.: I recorded a video tutorial where you can clearly see how to install WIndows XP on your computer from a disk.
Installing Windows XP is easy! In this article, we provide step-by-step instructions for installing the operating system for beginners.
An illustration of each step will help you quickly master the process of installing the Windows XP operating system from a disk.
What is Windows XP?
Windows XP is an operating system (OS) produced by Microsoft, released at the end of 2001. Windows XP can be called an improved version of Windows 2000 Professional. After XP came Vista (in 2007) and Windows 7 (at the end of 2009).
By the beginning of 2011, Windows XP is the most popular operating system in the world and in Russia.
Windows XP has 3 official add-ons, the so-called SP (Service Pack) 1,2,3,4. They added and improved the basic version of the program.
The largest number of different programs and utilities are compatible with the XP operating system.
Why install Windows XP?
Why do you need to install Windows at all? In what cases is this necessary?
Typically, Windows XP installation occurs for two reasons:
1. You bought a computer without a pre-installed operating system.
You won’t be able to work on such a computer, since you simply won’t find the folders, pictures and files that are familiar to our eyes, but only a blinking cursor, and the BIOS.
2. You are not satisfied with your current operating system.
- You want to install a clean system to get rid of system errors, all kinds of garbage, viruses, rubbish in the form of remnants of programs that have not been completely removed.
- You prefer Windows XP to all other operating systems due to its unique features.
How to install Windows XP?
Windows XP can be installed in several ways: from a floppy disk, from a CD/DVD disk, from a flash drive. We will look at the classic installation of an operating system from a disk.
Installing Windows XP is easy! Our step-by-step instruction will help you with this.
1. Preparation.
Prepare: a multiboot disk with Windows XP, a set of drivers for your equipment.
2. The installation process takes place in several stages:
First stage: BIOS
BIOS is the basic software that boots the computer.
How to enter BIOS: when you turn on the computer, press the DEL button (sometimes the F2, F10 or F12 keys, mainly on laptops)
BIOS setup: you need to boot from CD-ROM. BIOS language is English.
We find the Advanced Setup section, then set First Boot Device from CD-ROM(on the right are hints on which buttons to use to change the position of the devices)

Saving changes to BIOS: Press the F10 button and select Y (Yes). The computer will restart, but with the changed settings.

Press F8 to agree and continue installing licensed Windows XP
Select the partition on which you want to install Windows.

To create a new partition, use the C key and set the desired size (for XP, the optimal size is at least 15 GB.)
To delete the highlighted partition, use the D key.

Quickly format your partition by confirming your decision by pressing the F key. Formatting to NTFS will rid you of all records on the hard drive partition of your choice.
Warning! Formatting deletes ALL data from your disk.
Be careful and save the documents you need in advance.


After formatting the hard drive and copying files, the system components are unpacked and installed. During the installation process, the computer will restart several times.
At the 33rd minute you set language and regional standards, assign a name and name of the organization (any) 
enter from the sticker, case insensitive

Stage three: Complete the installation of Windows XP.
Let's set it up now workgroup and domain. 
Setting up Windows XP


Windows XP is a good option for installing on a netbook, a weak desktop computer, or a laptop that was released many years ago.
The Windows XP operating system, despite the fact that it was released in 2001, is still well suited for working on low-power, outdated computers. More modern operating systems Windows 10, Windows 8.1, Windows 8, Windows 7 place more severe demands on computer hardware.
During times creating Windows XP, to install the operating system, CDs were used that were inserted into the CD/DVD drives of the computer. Era of portable USB flash drives has not yet arrived, so Microsoft has not provided a tool for installing the system from a bootable USB flash drive.
Installing Windows XP via a USB flash drive takes place in three stages:
- Creating a bootable USB flash drive.
- Selecting to boot from a USB flash drive in the computer BIOS.
- Installing Windows XP on a computer from an installation flash drive.
Creating a bootable USB flash drive with Windows XP
To create a bootable USB flash drive, we use free program WinSetupFromUSB. We also need a blank USB drive for recording on the system’s flash drive.
There is a detailed article on my website. Read the article, write the operating system onto a flash drive according to the instructions.
Selecting boot priority in BIOS
Insert the USB flash drive with Windows XP into the USB connector, and then turn on the computer. Immediately after starting the PC, you need to press a specific keyboard key to enter BIOS settings to select boot priority from a bootable USB flash drive or DVD drive.
Different devices use different keys or key combinations.
After starting the computer, testing the equipment begins, at this time you need to quickly press the key to enter the BIOS. The most commonly used keys are "Del", "F2" and "F8" for fast loading.
Work in the BIOS is carried out using keyboard keys. The BIOS window provides explanations in English about which keys you need to use for configuration.
In the AMIBIOS settings, go to the Advanced BIOS Features menu, where you need to select as the first boot USB devices disk, moving it to first place.
AMI BIOS ver.3.31a
In other BIOS versions, open the Boot tab, select USB flash drive , install it as the first boot device if you are installing from a USB flash drive. Select DVD drive, if you are installing from disk.
Save the settings and then exit the BIOS. Immediately after this, the computer will boot from the installation flash drive or from a CD/DVD disk if an optical disk is used to install Windows XP.
If you didn't manage to enter the BIOS in time, it's okay: restart your computer again, and then try again.
How to install Windows XP from a USB flash drive
In the first window with the inscription “Press any key to boot from CD” you need to press any key on the keyboard.
To create a flash drive, we used the WinSetupFromUSB program, so the MultiBoot USB window will open on the screen, in which you need to select « Microsoft installation Windows XP SP3 x86 - Russian version".
If you install from disk, the window located above does not appear.
The installation of Windows XP begins. After downloading necessary files The Windows XP Professional Setup window opens. Necessarily
Press any key, otherwise the installation will not start. 
Press the " Enter» to start installation of the operating system.
All offered options:
1. Proceed with installing windows xp (Enter key)
2. Restore Windows (R key)
3. Exit the installer (F3 key)

We accept the license agreement by clicking on the " F8».

If the system is already installed on the computer, the hard drive partitions will be displayed in the window. You can delete all partitions and install the system in an unallocated area, (be careful, after deleting a partition or formatting it, you will lose all data) or select an existing system partition for installation.
We will install Windows XP in an unallocated area. In the unallocated area, if necessary, you can create an additional non-system disk partition (partition D for data storage).
On our computer, an unallocated area is selected. To start Windows installation, click on “ Enter». 
- Format partition in NTFS system (Quick).
- Format the partition in the NTFS system.
This window may prompt you to format in file system FAT, don't consider this option.
You can choose any of these formatting options in NTFS. In the first case, formatting the partition will be faster.

The system partition is being formatted.

The system copies the files to the Windows installation folders.

Upon completion, the computer will restart.
Next, a window will appear with the inscription “Press any key to boot from CD”, in This time we don't press anything!  The installation program window displays information about the functions of the operating system. Windows XP will take some time to install, and the estimated time until installation is complete is displayed in the Windows Setup window.

On top of the System Installation Wizard window, windows open for configuring certain parameters.
In the window " language and regional standards» select the language, click on the « Further" In the Russified version of Windows XP, Russian is selected by default.

In the next window, be sure to enter “ Name account", for example Alexander.
You can enter anything you want. This name will appear in the system as the computer username.
If you are a regular user, " Name of the organization» do not enter. 
In the Product Key window, enter the key for your copy of Windows. (this window may not appear - depending on the build of Windows XP ). You can skip this step; the system can be activated later, after installation on your computer is complete.

If you did not enter the key in the previous window, in the " Error» click on the button « No».
In the next window, enter " Computer name", such as Dell, and administrator password. If you do not use a password, leave the corresponding fields blank, and then click on the " Further" If necessary, you can set the administrator password later. 
In the window " Setting the time and date» — select time, date and time zone.

The Windows XP Setup window will open again.

In the next window " Network settings» select « Regular Options».

In the window " Workgroup or domain» click on the button « Further", without changing anything.  The Windows XP installation window will open again.

The installation of the operating system continues for some time. After installation is complete, the computer will restart.

A welcome window will open and then Windows XP will start. 
Windows XP installation complete.
Enter the BIOS, again select the computer's hard drive (HDD) as the first boot device. Next, install the necessary drivers on your PC. You may have the drivers on the disk that came with your computer, or you can go to the official website of the equipment manufacturer and download the necessary drivers from there. More details about this in the article: “. This article contains links to the official websites of manufacturers motherboards and video adapters.
In contact with
This article discusses the procedure for installing Windows XP on a computer that already has Windows 7 installed and the sequence of steps required to create a dual-boot configuration where, when you turn on the computer, a menu is available to select the operating system to boot.
Introduction
It is generally accepted that the more correct Windows installation sequence is to install the minor version before the older one. In this case, it is possible to boot an older system, and after installing a newer OS, a menu for selecting a bootable system appears.
However, the sequence does not matter if you know the principles of loading operating systems. Let's consider a situation where Windows 7 is already installed, but you need to install Windows XP on your computer. The article is intended to help avoid pitfalls for those who plan to install Windows XP after Windows 7.
Initial data
Installing Windows XP
A lot of articles have been written about installing Windows XP, so there is no point in dwelling on this issue in detail within the framework of this article. The only thing is to install Windows XP when already installed Windows 7 you can only boot from the installation Windows disk XP. During installation, you must specify a disk partition that was prepared in advance.
Figure 2 - Selecting a partition for installing Windows XP
Already in this figure you can see that the partition that does not have a letter in Windows 7 is assigned the letter C, and the partition with Windows 7 is assigned the letter D.
This is how the “disk management” picture looks after installing Windows XP
Figure 3 - Disk Management in Windows XP
After installing Windows XP, there is no choice of operating systems at boot, nor, accordingly, the ability to Windows boot There won't be 7.
Pay attention to the changes that have occurred with the hidden “System Reserved” section: it has become visible (it is assigned the letter C). Let's see what is located on the active section (C). To do this, you need to disable hiding in the folder properties. system files and allow them to be displayed:

Figure 4 - Enabling the display of hidden and system files
So, on partition C we see Windows 7 boot files: bootloader - bootmgr and folder Boot, in which the boot menu interface files are located, the boot data storage file - bcd, memory test program files - memtest.exe. In addition, it now contains the Windows XP boot files: ntldr, ntdetect.com, boot.ini.
Figure 5 - Boot files for Windows 7 and XP operating systems
Restoring the Windows 7 boot loader in Windows XP
To restore Windows 7 boot, you need to use the Windows 7 installation disc.
Insert the Windows 7 installation disk, find the file on it bootsect.exe in folder BOOT. Please note: the path to the bootsect.exe file is F:\boot\bootsect.exe. In your case, instead of F there will be a letter belonging to the CD - DVD drive

Figure 6 - Contents of the BOOT folder of the Windows 7 installation disk
Launch command prompt: click Start - Execute, enter in the field cmd. Once prompted, enter the following command
Figure 7 - Flow of the bootsect command
The result of the command will be the restoration of the Windows 7 master boot record and boot code, which transfers control to the Windows 7 boot manager.
Creating a Dual Boot Configuration on Windows XP
As you know, there is no utility for changing configuration data in XP, but it is in the folder with Windows 7 installed. To apply it correctly in XP, you need to enter the System32 directory of the Windows 7 operating system at the command line. After the transition, run the following commands in sequence:
Bcdedit /create (ntldr) /d " Microsoft Windows XP"
This command creates a Windows XP download store in the Windows 7 download store. Running this command may fail because the repository is already created by default, so you just need to rename it:
Bcdedit /set (ntldr) description "Microsoft Windows XP"
The following command will tell the Windows 7 boot loader the device location of the XP boot files:
The following command will point the Windows 7 bootloader to the Windows XP bootloader:
Bcdedit /set (ntldr) path \ntldr
The following command will add the line about choosing Windows XP in the boot menu and will place it under the others:
Bcdedit /displayorder (ntldr) /addlast
Figure 8 - Complete list of commands for creating a boot menu in Windows XP
You can check whether the commands are executed correctly and the presence of the boot menu by running in the window command line team bcdedit or by analyzing the bootcfg file obtained by running the bcdedit >c:\bootcfg.txt command. The file will be located in the root directory of drive C.
Figure 9 - Checking for the presence of a Windows XP boot entry and boot menu
After running these commands, when you boot your computer, you will be given the option to select the OS to boot.
Figure 10 - Selecting OS to boot
It may be more convenient for many to reduce the OS boot selection timeout, which by default is 30 seconds. To configure this parameter, use the command
Bcdedit /timeout XX
Where XX is the timeout time in seconds.
Features of creating a dual boot configuration in Windows 7
If you are just going to install Windows XP, then you can create a dual-boot configuration in advance, while still running Windows 7. The same recommendations will help when you restored the Windows 7 boot loader while in Windows XP, and decided to create a dual-boot configuration later.
In this case, some features should be taken into account.
Commands, just like in Windows XP, are executed on the command line. IN Windows system 7 These commands must be run from an elevated command prompt. To do this, click the button Start, select item Standard, right-click the Command Prompt shortcut and select , or like this:
Click Start and in the search field enter cmd
On the found file, right-click and select the item in the context menu Run as administrator.

Figure 11 - Running command prompt with elevated rights (as administrator)
The order of execution of the commands is the same, with the exception of one. As you know, the Windows 7 and Windows XP boot files are located on a hidden partition that does not have the letter . Therefore, instead of the command
Bcdedit /set (ntldr) device partition=C:
Need to do
Bcdedit /set (ntldr) device partition=\Device\HarddiskVolume1
This note does not make sense if for some reason (for example, if your hard drive was partitioned before installation), the hidden boot partition was not created and the system boot files are on the same one as Windows 7 section.
Conclusion
Even if the installation sequence of operating systems is not entirely correct, it is not difficult to organize their correct loading without resorting to complex manipulations or third party programs. Using the Windows 7 installation disc, you can restore the ability to boot into this operating system, and using the utility bcdedit configure the loading of two operating systems.


