Программа для определения ошибки синего экрана. Общие рекомендации по устранению ошибок BSOD для начинающих. Проверка операционной системы, ее обновление и обновление драйверов
Related Utilities
- WinCrashReport - Displays a report about crashed Windows application.
- WhatIsHang - Get information about Windows software that stopped responding (hang)
- AppCrashView - View application crash information on Windows 7/Vista.
See Also
- NK2Edit - Edit, merge and fix the AutoComplete files (.NK2) of Microsoft Outlook.
Description
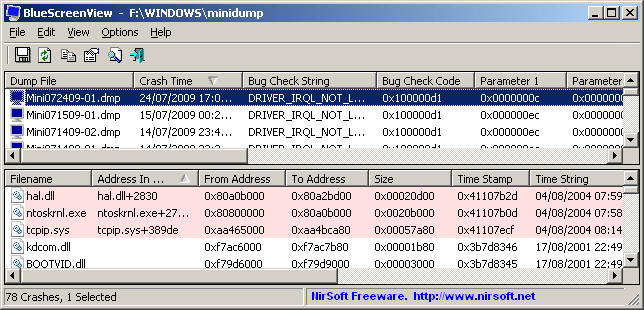
BlueScreenView scans all your minidump files created during "blue screen of death" crashes, and displays the information about all crashes in one table. For each crash, BlueScreenView displays the minidump filename, the date/time of the crash, the basic crash information displayed in the blue screen (Bug Check Code and 4 parameters), and the details of the driver or module that possibly caused the crash (filename, product name, file description, and file version).For each crash displayed in the upper pane, you can view the details of the device drivers loaded during the crash in the lower pane. BlueScreenView also mark the drivers that their addresses found in the crash stack, so you can easily locate the suspected drivers that possibly caused the crash.

Versions History
- Version 1.55:
- Added Drag & Drop support: You can now drag a single MiniDump file from Explorer into the main window of BlueScreenView.
- Fixed bug: BlueScreenView failed to remember the last size/position of the main window if it was not located in the primary monitor.
- Version 1.52:
- Added "Google Search - Bug Check" and "Google Search - Bug Check + Parameter 1" options.
- Version 1.51:
- Added automatic secondary sorting ("Crash Time" column).
- Added 64-bit build.
- Version 1.50:
- The "Crash Time" now displays more accurate date/time of the crash. In previous versions, the value of "Crash Time" column was taken from the date/time of dump file, which actually represents that time that Windows loaded again, after the crash. The actual crash time is stored inside the dump file , and now the "Crash Time" displays this value.
- Added "Dump File Time" column, which displays the modified time of the dump file.
- Version 1.47:
- Added "Auto Size Columns+Headers" option, which allows you to automatically resize the columns according to the row values and column headers.
- Version 1.46:
- Fixed issue: The properties and the "Advanced Options" windows opened in the wrong monitor, on multi-monitors system.
- Version 1.45:
- You can now choose to open only a specific dump file - from the user interface or from command-line.
- You can now also specify the MiniDump folder or MiniDump file as a single parameter, and BlueScreenView will be opened with the right dump file/folder, for example: BlueScreenView.exe C:\windows\minidump\Mini011209-01.dmp
- Version 1.40:
- Added "Raw Data" mode on the lower pane, which displays the processor registers and memory hex dump.
- Version 1.35:
- Added "Crash Address" column.
- Added 3 columns that display that last 3 calls found in the stack (Only for 32-bit crashes)
- Version 1.32:
- Added "Mark Odd/Even Rows" option, under the View menu. When it"s turned on, the odd and even rows are displayed in different color, to make it easier to read a single line.
- Version 1.31:
- Added "Google Search - Bug Check+Driver" for searching in Google the driver name and bug check code of the selected blue screen.
- Version 1.30:
- Added "Dump File Size" column.
- Version 1.29:
- You can now send the list of blue screen crashes to stdout by specifying an empty filename ("") in the command-line of all save parameters.
For example: bluescreenview.exe /stab "" > c:\temp\blue_screens.txt
- You can now send the list of blue screen crashes to stdout by specifying an empty filename ("") in the command-line of all save parameters.
- Version 1.28:
- Added "Add Header Line To CSV/Tab-Delimited File" option. When this option is turned on, the column names are added as the first line when you export to csv or tab-delimited file.
- Version 1.27:
- Fixed issue: removed the wrong encoding from the xml string, which caused problems to some xml viewers.
- Version 1.26:
- Fixed "DumpChk" mode to work properly when DumpChk processing takes more than a few seconds.
- Version 1.25:
- Added "DumpChk" mode, which displays the output of Microsoft DumpChk utility (DumpChk.exe). You can set the right path and parameters of DumpChk in "Advanced Options" window. By default, BlueScreenView tries to run DumpChk from "%programfiles%\Debugging Tools for Windows"
- The default MiniDump folder is now taken from HKEY_LOCAL_MACHINE\SYSTEM\CurrentControlSet\Control\CrashControl
- Version 1.20:
- Added 3 new columns in the upper pane: Processors Count, Major Version, Minor Version.
- Added "Explorer Copy" option, which allows you to copy dump files to the clipboard and then paste them into Explorer window.
- Version 1.15:
- Added option to view the blue screen list of multiple computers on your network. The computer names are specified in a simple text file. (See below).
- Added Combo-Box to easily choose the MiniDump folders available in the hard-disks currently attached to your computer.
- Added "Computer Name" and "Full Path" columns.
- Version 1.11:
- Added /sort command-line option.
- Version 1.10:
- Added accelerator keys for allowing you to toggle between modes more easily.
- Added command-line options for saving the crash dumps list to text/csv/html/xml file.
- Added command-line option for opening BlueScreenView with the desired MiniDump folder.
- Fixed focus problems when opening the "Advanced Options" window.
- Added "default" button to the "Advanced Options" window.
- Added "processor" column - 32-bit or x64.
- Version 1.05 - Added support for x64 MiniDump files.
- Version 1.00 - First release.
BlueScreenView Features
- Automatically scans your current minidump folder and displays the list of all crash dumps, including crash dump date/time and crash details.
- Allows you to view a blue screen which is very similar to the one that Windows displayed during the crash.
- BlueScreenView enumerates the memory addresses inside the stack of the crash, and find all drivers/modules that might be involved in the crash.
- BlueScreenView also allows you to work with another instance of Windows, simply by choosing the right minidump folder (In Advanced Options).
- BlueScreenView automatically locate the drivers appeared in the crash dump, and extract their version resource information, including product name, file version, company, and file description.
System Requirements
- BlueScreenView works with Windows XP, Windows Server 2003, Windows Server 2008, Windows Vista, Windows 7, Windows 8, Windows 10, as long as Windows is configured to save minidump files during BSOD crashes. If your system doesn"t create MiniDump files on a blue screen crash, try to configure it according to the following article:
- BlueScreenView can read the MiniDump files of both 32-bit and x64 systems.
- Be aware that on Windows 10, some of the created MiniDump files might be empty and BlueScreenView will not display them.
Using BlueScreenView
BlueScreenView doesn"t require any installation process or additional dll files. In order to start using it, simply run the executable file - BlueScreenView.exeAfter running BlueScreenView, it automatically scans your MiniDump folder and display all crash details in the upper pane.
Crashes Information Columns (Upper Pane)
- Dump File: The MiniDump filename that stores the crash data.
- Crash Time: The created time of the MiniDump filename, which also matches to the date/time that the crash occurred.
- Bug Check String: The crash error string. This error string is determined according to the Bug Check Code, and it"s also displayed in the blue screen window of Windows.
- Bug Check Code: The bug check code, as displayed in the blue screen window.
- Parameter 1/2/3/4: The 4 crash parameters that are also displayed in the blue screen of death.
- Caused By Driver: The driver that probably caused this crash. BlueScreenView tries to locate the right driver or module that caused the blue screen by looking inside the crash stack. However, be aware that the driver detection mechanism is not 100% accurate, and you should also look in the lower pane, that display all drivers/modules found in the stack. These drivers/modules are marked in pink color.
- Caused By Address: Similar to "Caused By Driver" column, but also display the relative address of the crash.
- File Description: The file description of the driver that probably caused this crash. This information is loaded from the version resource of the driver.
- Product Name: The product name of the driver that probably caused this crash. This information is loaded from the version resource of the driver.
- Company: The company name of the driver that probably caused this crash. This information is loaded from the version resource of the driver.
- File Version: The file version of the driver that probably caused this crash. This information is loaded from the version resource of the driver.
- Crash Address: The memory address that the crash occurred. (The address in the EIP/RIP processor register) In some crashes, this value might be identical to "Caused By Address" value, while in others, the crash address is different from the driver that caused the crash.
- Stack Address 1 - 3: The last 3 addresses found in the call stack. Be aware that in some crashes, these values will be empty. Also, the stack addresses list is currently not supported for 64-bit crashes.
Drivers Information Columns (Lower Pane)
- Filename: The driver/module filename
- Address In Stack: The memory address of this driver that was found in the stack.
- From Address: First memory address of this driver.
- To Address: Last memory address of this driver.
- Size: Driver size in memory.
- Time Stamp: Time stamp of this driver.
- Time String: Time stamp of this driver, displayed in date/time format.
- Product Name: Product name of this driver, loaded from the version resource of the driver.
- File Description: File description of this driver, loaded from the version resource of the driver.
- File Version: File version of this driver, loaded from the version resource of the driver.
- Company: Company name of this driver, loaded from the version resource of the driver.
- Full Path: Full path of the driver filename.
Lower Pane Modes
Currently, the lower pane has 4 different display modes. You can change the display mode of the lower pane from Options->Lower Pane Mode menu.- All Drivers: Displays all the drivers that were loaded during the crash that you selected in the upper pane. The drivers/module that their memory addresses found in the stack, are marked in pink color.
- Only Drivers Found In Stack: Displays only the modules/drivers that their memory addresses found in the stack of the crash. There is very high chance that one of the drivers in this list is the one that caused the crash.
- Blue Screen in XP Style: Displays a blue screen that looks very similar to the one that Windows displayed during the crash.
- DumpChk Output:
Displays the output of Microsoft DumpChk utility.
This mode only works when Microsoft DumpChk is installed on your computer and
BlueScreenView is configured to run it from the right folder (In the Advanced Options window).
You can get DumpChk from the installation CD/DVD of Windows or with the installtion of Debugging Tools for Windows .
Crashes of Remote Network Computer
If you have multiple computers on your network and you have full administrator access to them (e.g: you have access to \\ComputerName\c$), you can also view the crashes of the other computers on your network remotely. In order to do that, simply go to "Advanced Options" (Ctrl+O) and type the MiniDump folder of the remote computer, for example: \\MyComp\c$\Windows\MiniDump.Notice: If you fail to get full administrator access to the remote computer, you should read the instructions in the following Blog post: .
Watching the crashes of multiple computers on your network
If you have a network with multiple computers, and you have full admin access to these computers, you can view the blue screens list of all these computers in one table, and easily detect computers with recurring BSOD problems.In order to use this feature, prepare a list of all computer names/IP addresses that you want to inspect, and save it to a simple text file.
The computer names in the list can be delimited by comma, semicolon, tab character, or Enter (CRLF).
Example for computer names list:
Comp01 comp02 192.168.0.1 192.168.0.2 192.168.0.4 After you have a text file contains the computers list, you can go to Advanced Options window (Ctrl+O), choose the second option and type the computers list filename.
Command-Line Options
|
/LoadFrom |
Specifies the source to load from.
1 -> Load from a single MiniDump folder (/MiniDumpFolder parameter) 2 -> Load from all computers specified in the computer list file. (/ComputersFile parameter) 3 -> Load from a single MiniDump file (/SingleDumpFile parameter) |
|
/MiniDumpFolder | Start BlueScreenView with the specified MiniDump folder. |
|
/SingleDumpFile | Start BlueScreenView with the specified MiniDump file. (For using with /LoadFrom 3) |
|
/ComputersFile | Specifies the computers list filename. (When LoadFrom = 2) |
| /LowerPaneMode <1 - 3> | Start BlueScreenView with the specified mode. 1 = All Drivers, 2 = Only Drivers Found In Stack, 3 = Blue Screen in XP Style. |
|
/stext | Save the list of blue screen crashes into a regular text file. |
|
/stab | Save the list of blue screen crashes into a tab-delimited text file. |
|
/scomma | Save the list of blue screen crashes into a comma-delimited text file (csv). |
|
/stabular | Save the list of blue screen crashes into a tabular text file. |
|
/shtml | Save the list of blue screen crashes into HTML file (Horizontal). |
|
/sverhtml | Save the list of blue screen crashes into HTML file (Vertical). |
|
/sxml | Save the list of blue screen crashes into XML file. |
|
/sort |
This command-line option can be used with other save options for sorting by the desired column.
If you don"t specify this option, the list is sorted according to the last sort that you made from the user interface.
The Examples:
|
| /nosort | When you specify this command-line option, the list will be saved without any sorting. |
Translating BlueScreenView to other languages
In order to translate BlueScreenView to other language, follow the instructions below:- Run BlueScreenView with /savelangfile parameter:
BlueScreenView.exe /savelangfile
A file named BlueScreenView_lng.ini will be created in the folder of BlueScreenView utility. - Open the created language file in Notepad or in any other text editor.
- Translate all string entries to the desired language. Optionally, you can also add your name and/or a link to your Web site. (TranslatorName and TranslatorURL values) If you add this information, it"ll be used in the "About" window.
- After you finish the translation, Run BlueScreenView, and all translated
strings will be loaded from the language file.
If you want to run BlueScreenView without the translation, simply rename the language file, or move it to another folder.
License
This utility is released as freeware. You are allowed to freely distribute this utility via floppy disk, CD-ROM, Internet, or in any other way, as long as you don"t charge anything for this. If you distribute this utility, you must include all files in the distribution package, without any modification !Здравствуйте! Сегодня мы поговорим о проблеме синего экрана смерти — BlueScreen. Многие пользователи, в процессе работы или игры за компьютером, сталкиваются с ним. Мы расскажем, что это такое «Имя события проблемы: BlueScreen» и что нужно делать что бы исправить её. Также, опишем решение проблемы с ошибкой BlueScreen 1049.
Практически каждый из нас сталкивался с Синим экраном смерти. Давайте попробуем дать простое определение этой проблеме, итак:
BlueScreen — это «сообщение», адресованное пользователю, в котором говорится о критической системной ошибке и о том, что компьютер будет перезагружен с потерей всех не сохраненных данных. Также, в сообщении указываются общие причины неполадки и код ошибки. Специалисты называют такую проблему BSOD (Blue Screen of Death).
Для Windows 7, в случае возникновения синего экрана, после перезагрузки появляется сообщение-отчет об ошибке.

Причин возникновения BSOD могут быть разные, от физических до системных:
- Проблемы с компьютерным «железом» — неправильно установленные устройства;
- Перегрев видеокарты, процессора или других комплектующих ноутбука или ПК;
- Перепад напряжения в сети;
- Неправильно установленные обновления Windows;
- Удаленны важные системные файлы или папки;
- Неправильно установленные драйвера — самая распространенная ошибка .
Как правило, в случае возникновения Синего экрана, многим пользователям помогает простая перезагрузка. После неё все приходит в норму. Но если проблема заключается в драйверах, то в определенных случаях, проблема будет повторяться. Такое возможно когда пользователь запускает игру или программу. Давайте разберемся в том, что же нужно делать в таком случае и как определить что именно не нравится системе.
Очень часто, при появлении ошибки BSOD экран появляется буквально на секунду и далее следует перезагрузка. Что бы ознакомится с проблемой и идентифицировать код в первую очередь необходимо убрать перезагрузку. Войдите в Панель управления\Все элементы панели управления\Система. Нажмите на Дополнительные параметры системы. В открывшемся окне снимите галочку с Выполнить автоматическую перезагрузку.

После этого, вы сможете записать код ошибки. Источников проблем и кодов может быть огромное множество. Поэтому далее, вам следует вписать этот код в поисковый запрос и найти решение в интернете. Единого решения в таких ситуациях нет, каждую проблему нужно решать отдельно.
Диагностику с перегревом и физическими неполадками очень хорошо проводит программа AIDA64. При системных неполадках для поиска и определения подойдет BlueScreenView. Она определит в список все дампы (.dmp — отчет об ошибке) и анализирует все данные, указывая даже драйвер приведший к проблеме. Более подробно об утилите BlueScreenView вы можете узнать в этом видеоролике (ближе к концу).
BlueScreen код 1049 что это за проблема
Одной из самых распространенных причин могут быть неполадки с драйверами видеокарты. В таком случае, появляется сообщение «Имя события проблемы: BlueScreen» (код 1049), которое означает нарушение в работе видеокарты. В данном случае, необходимо:
- Отключить в настройках встроенную видеокарту (если таковая имеется);
- Полностью обновить драйвера на видео;
- Проверить физические параметры — на перегрев и плотно ли сидит в слоте;
- Воспользоваться утилитой BlueScreenView для определения.
Цитата: rier
Запустил, и ничего не происходит. Как включить сканирование?
Несмотря на то, что вопрос имеет 2х годичную давность, но для счастливых обладателе СЭС он актуален, и утилита BlueScreenView им в помощь.
Кратко об основном
:
Говорим BSOD (не оф назв), подразумеваем СЭС, STOP код, crash dump, memory dump.
Возникает при угрозе краха ОС, т.е., разработчик ограждает ОС от "шаловливых ручек".
Обычно, СЭС выскакивает, если проблемы с железом, драйверами оборудования. Программы зачастую не способны на СЭС, т.к. завершаться ошибкой, не затронув работы ОС, а те, которые работают на уровне ядра (драйвера), могут преподнести сюрприз.
Если настал критический день
: ОС получает STOP код
, прекращает общение, выводит на 1 сек Синий квадрат Билла Гейтса
, уходит на перезагрузку, и автоматом создает дамп памяти.
Чтобы наслаждаться этой чудо-картинкой: => ПКМ Компьютер
или W+Break
=> Дополнительные параметры системы
=> Вкладка => Параметры...
поле Отказ системы
- убрать метку Выполнять автоматическую перезагрузку
, а также, убрать метку Заменять существующий файл дампа
(может пригодиться при повторяющихся ошибках). Там же Запись отладочной информации
есть выбор: Дамп памяти ядра
или Малый дамп памяти
с указанием соответствующих путей сохранения дампов.
Но, если Вы, не стали счастливым обладателем СЭС, не беда, мы его создадим, ведь врага надо знать в лицо .
=> W+R => regedit => Enter =>
Для клавы PS/2: HKEY_LOCAL_MACHINE\SYSTEM\CurrentControlSet\Services\i8042prt\Parameters
Для клавы USB: HKEY_LOCAL_MACHINE\System\CurrentControlSet\Services\kbdhid\Parameters
Создайте новый 32бит параметр DWORD, назвав его CrashOnCtrlScroll, с значением 1.
Перезагрузить ПК.
Теперь это счастье в ваших руках: зажав правую клавишу CTRL два раза нажмите Scroll Lock , вы получите , нас интересует в рамках 1 и 2 .
Что в переводе означает:
Обнаружена проблема и, чтобы предотвратить повреждение ПК, ОС была отключена.
Пользователь вручную создал аварийный дамп памяти
.
Если первый раз видите стоп экран - перезагрузите ПК.
При повторе:
Проверьте, правильно ли установлено какое-то новое устройство или ПО.
Если новая установка, обратитесь к производителю устройства или ПО и за обновами Windows.
Если проблемы продолжаются, отключите/удалите все вновь установленные устройства или ПО.
Отключите параметры памяти BIOS – кеширование/теневое копирование.
Если нужен безопасный режим для удаления/отключения компонентов, перезагрузите ПК => F8 => Дополнительные параметры запуска => Безопасный режим.
Техническая информация:
*** STOP: 0x000000E2 (0x00000000, 0x00000000, 0x00000000, 0x00000000)
Сбор данных для аварийного сброса...
Инициализация диска для аварийного сброса...
Начало сброса физической памяти.
Сбрасывание физической памяти на диск: 100
Сброс физической памяти.
Для получения доп помощи обратитесь к админу/группе тех поддержки.
Ошибка 0x000000E2 указывает, что пользователь сознательно инициировал аварийный дамп с помощью отладчика ядра или же, используя клавиатуру.
Запускайте BlueScreenView, смотрите..., если не увидит, помогите через Настройки = Дополнительные параметры...
«Синий экран смерти» - ошибка, с которой приходилось сталкиваться каждому пользователю операционной системы Windows. На английском языке она называется Blue Screen of Death, а если говорить сокращенно, то BSOD. Сама по себе ошибка всегда приводит к одному – перезагрузке компьютера. Однако ее могут вызывать сотни различных факторов, из-за чего сложно определить, что к ней приводит. В системе Windows имеются специальные диагностические инструменты, позволяющие сохранить лог ошибки, но расшифровать его сможет не каждый пользователь.
Именно с целью расшифровки причин возникновения «синего экрана смерти» используется приложение BlueScreenView. С его помощью можно легко определить, почему возникает летальная ошибка, и что нужно сделать, чтобы она более не повторялась.
Что такое BlueScreenView
BlueScreenView – это бесплатная программа, разработанная компанией Nir Sofer. Ее можно загрузить в интернете с официального сайта разработчиков и других проверенных ресурсов. Приложение поддерживает огромную библиотеку языков, в том числе и русский.
Программа BlueScreenView проводит сканирование на компьютере дамп файлов, в которых сохраняется информация об ошибке, приведшей к «синему экрану смерти». Пользователь с помощью программы получает возможность узнать максимум информации об ошибке: когда она произошла, какой конкретно код BSOD присудила операционная система Windows, сведения о драйверах и так далее.
Как настроить Windows для работы программы BlueScreenView
Чтобы приложение BlueScreenView рассказало о причинах возникновения ошибок, ему нужно обратиться к дамп файлам. По умолчанию в операционной системе Windows, с целью экономии места на жестком диске, записывается только последний дамп файл. Чтобы правильно настроить Windows для работы с приложением BlueScreenView, проделайте следующие действия:

За счет верных настроек Windows, приложение BlueScreenView будет иметь доступ ко всем случаям ошибок BSOD. Это позволит видеть более полно картину возникающей проблемы.
Как анализировать дамп программой BlueScreenView
Проанализировать ошибку, которая привела к возникновению «Синего экрана смерти» при помощи приложения BlueScreenView достаточно просто. Для этого необходимо проделать следующие действия:

Чтобы узнать подробнее о конкретном дампе, нажмите на него правой кнопкой мыши и выберите пункт «Google Search». В браузер будет отправлена вся необходимая информация об ошибке, из-за которой случился «синий экран смерти». Чаще всего решения по ошибке можно найти на сайте Microsoft, где будет указано, какие шаги нужно предпринять, чтобы устранить проблему. Если инструкция по устранению ошибки не найдена, следует поискать в ручном режиме техническую информацию об ошибке.

Часто специалисты просят от пользователей сбросить им данные о дампе ошибки, собрать которые можно через приложение BlueScreenView. Для этого нужно нажать правой кнопкой мыши на конкретный дамп и выбрать пункт «HTML Report – All Items». Ошибка будет импортирована в HTML-формате, после чего ее можно будет переслать техническому специалисту, который проведет анализ и попробует подобрать способ решения возникающей проблемы.
Из-за пиратских копий Windows, многие пользователи сталкиваются с критическим сбоем Bluescreen на своем ПК. Чаще всего баг вызывает появление Синего экрана, который выскакивает после запуска игр или программ. После перезагрузки юзер получает окно уведомления с сигнатурой проблемы: «Имя события проблемы: BlueScreen . Код языка: 1049 «. Также указаны дополнительные сведения: версия ОС (например - 6.1 7601.2 1.0 256.1) и BCCode (может быть разным 116, 124, 50, 19, d1, f4, a и другие).
Пример критической стоп-ошибки BlueScreen 1049Что это за сбой BlueScreen 1049?
Причин появления стоп ошибок Bluescreen большое множество. Сам код (1049) указывает, что драйвер не смог своевременно ответить на запрос системы. Среди основных причин возникновения сбоя, можно выделить следующие:
- Соответствующий драйвер имеет проблемы;
- Проблемы с перегревом аппаратных частей компьютера (материнской платы или видеокарты);
- Неудачные попытки разогнать видеокарту;
- Проблемы с ОЗУ компьютера и другие неисправности.
Что делать с проблемой 1049?
- В большинстве случаев, основная причина появления сбоев - это «битые» драйвера видеокарты. Вы можете проверить все видео-контроллеры в Диспетчере задач и отыскать битый драйвер (с желтым значком). Жмите по нему правой кнопкой и удаляйте. После удаления запустите мастер очистки реестра (я использую сторонние утилиты - CCleaner). После очистки нажмите по проблемному контроллеру и выберите «Обновить драйвера».
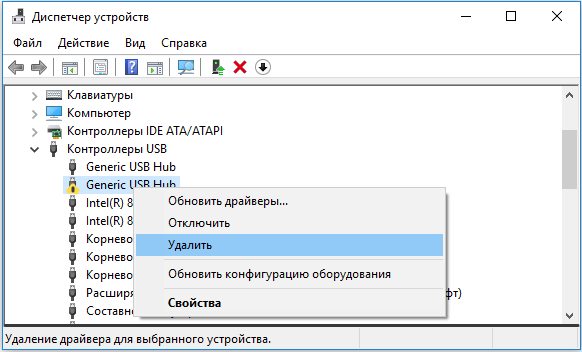 Пример удаления проблемных драйверов из Windows
 - Windows Installer работает очень плохо, поэтому лучше загрузить драйвера с официального ресурса разработчика или использовать диск со всеми конфигурациями, который идет в комплекте. Я же использую комплексную проверку и обновление всех драйверов при помощи утилиты DriverPack Solution
. Правда в ней появилось много дополнительных и рекламных установок в последнее время. Но дело свое DPS делает хорошо.
 Обновление драйверов Windows через DriverPack Solution
 - Если вы не смогли выполнить установку, либо обновление вам не помогло, тогда можно сделать откат системы до точки восстановления, где сбоев не наблюдалось.
- Также можно проверить работоспособность, запустив Windows в чистой загрузке . После чистого запуска - запустите необходимую игру или приложение и проверяйте. Следует знать, что иконок приложений или игр не будет. Их нужно вызывать из установочной папки или меню Пуск. Видео-инструкция.
- Если вы делали разгон любой из аппаратной частей ПК - отмените все.
- Для случаев со сбоями в играх - желательно обновить драйвера видеокарты на


